1. Overview
1.1. Reactor RabbitMQ Streams
Reactor RabbitMQ Streams is a reactive API for RabbitMQ based on Reactor RabbitMQ and Project Reactor which enables developers to easily build streaming applications focusing solely on how to produce and process their events and process them.
The API provides all the mechanism to ensure those events are delivered reliably and efficiently. And Project Reactor provides us a rich set of operators to manipulate streams in a very rich, declarative and efficient manner. Together they allow us to build rich streaming processing applications
1.2. Motivations
Reactor RabbitMQ API drastically simplify the interaction with RabbitMQ. We no longer need to deal with Channels to send messages to an
exchange or register a listener to receive messages from a queue. Instead, to send messages we provide a stream of messages.
A stream is modelled as a Flux<?>, which is the abstraction provided by Project Reactor. And to consume messages, the API gives you an
stream connected to the queue you want to consume messages from.
However, there are core set of capabilities which today are not present in the Reactor RabbitMQ API that without them it would be harder to write streaming applications.
Reactor RabbitMQ Streams library provides the following set of streaming capabilities:
-
Typed-safe streams
-
Efficient and reliable messaging (e.g. ack in batches, resend negative publisher confirms and/or returned messages)
-
End-to-End delivery guarantee within the JVM (i.e. ack input message only when we have successfully processed it, e.g. sent to another queue)
-
Declare entire RabbitMQ Topology as code (exchanges, queues, bindings, policies)
-
Queue partitioning
-
Automatic rebalance of consumers among partitions
-
Rich set of stream operations such as Windowing/aggregation provided by Reactor project
-
And more
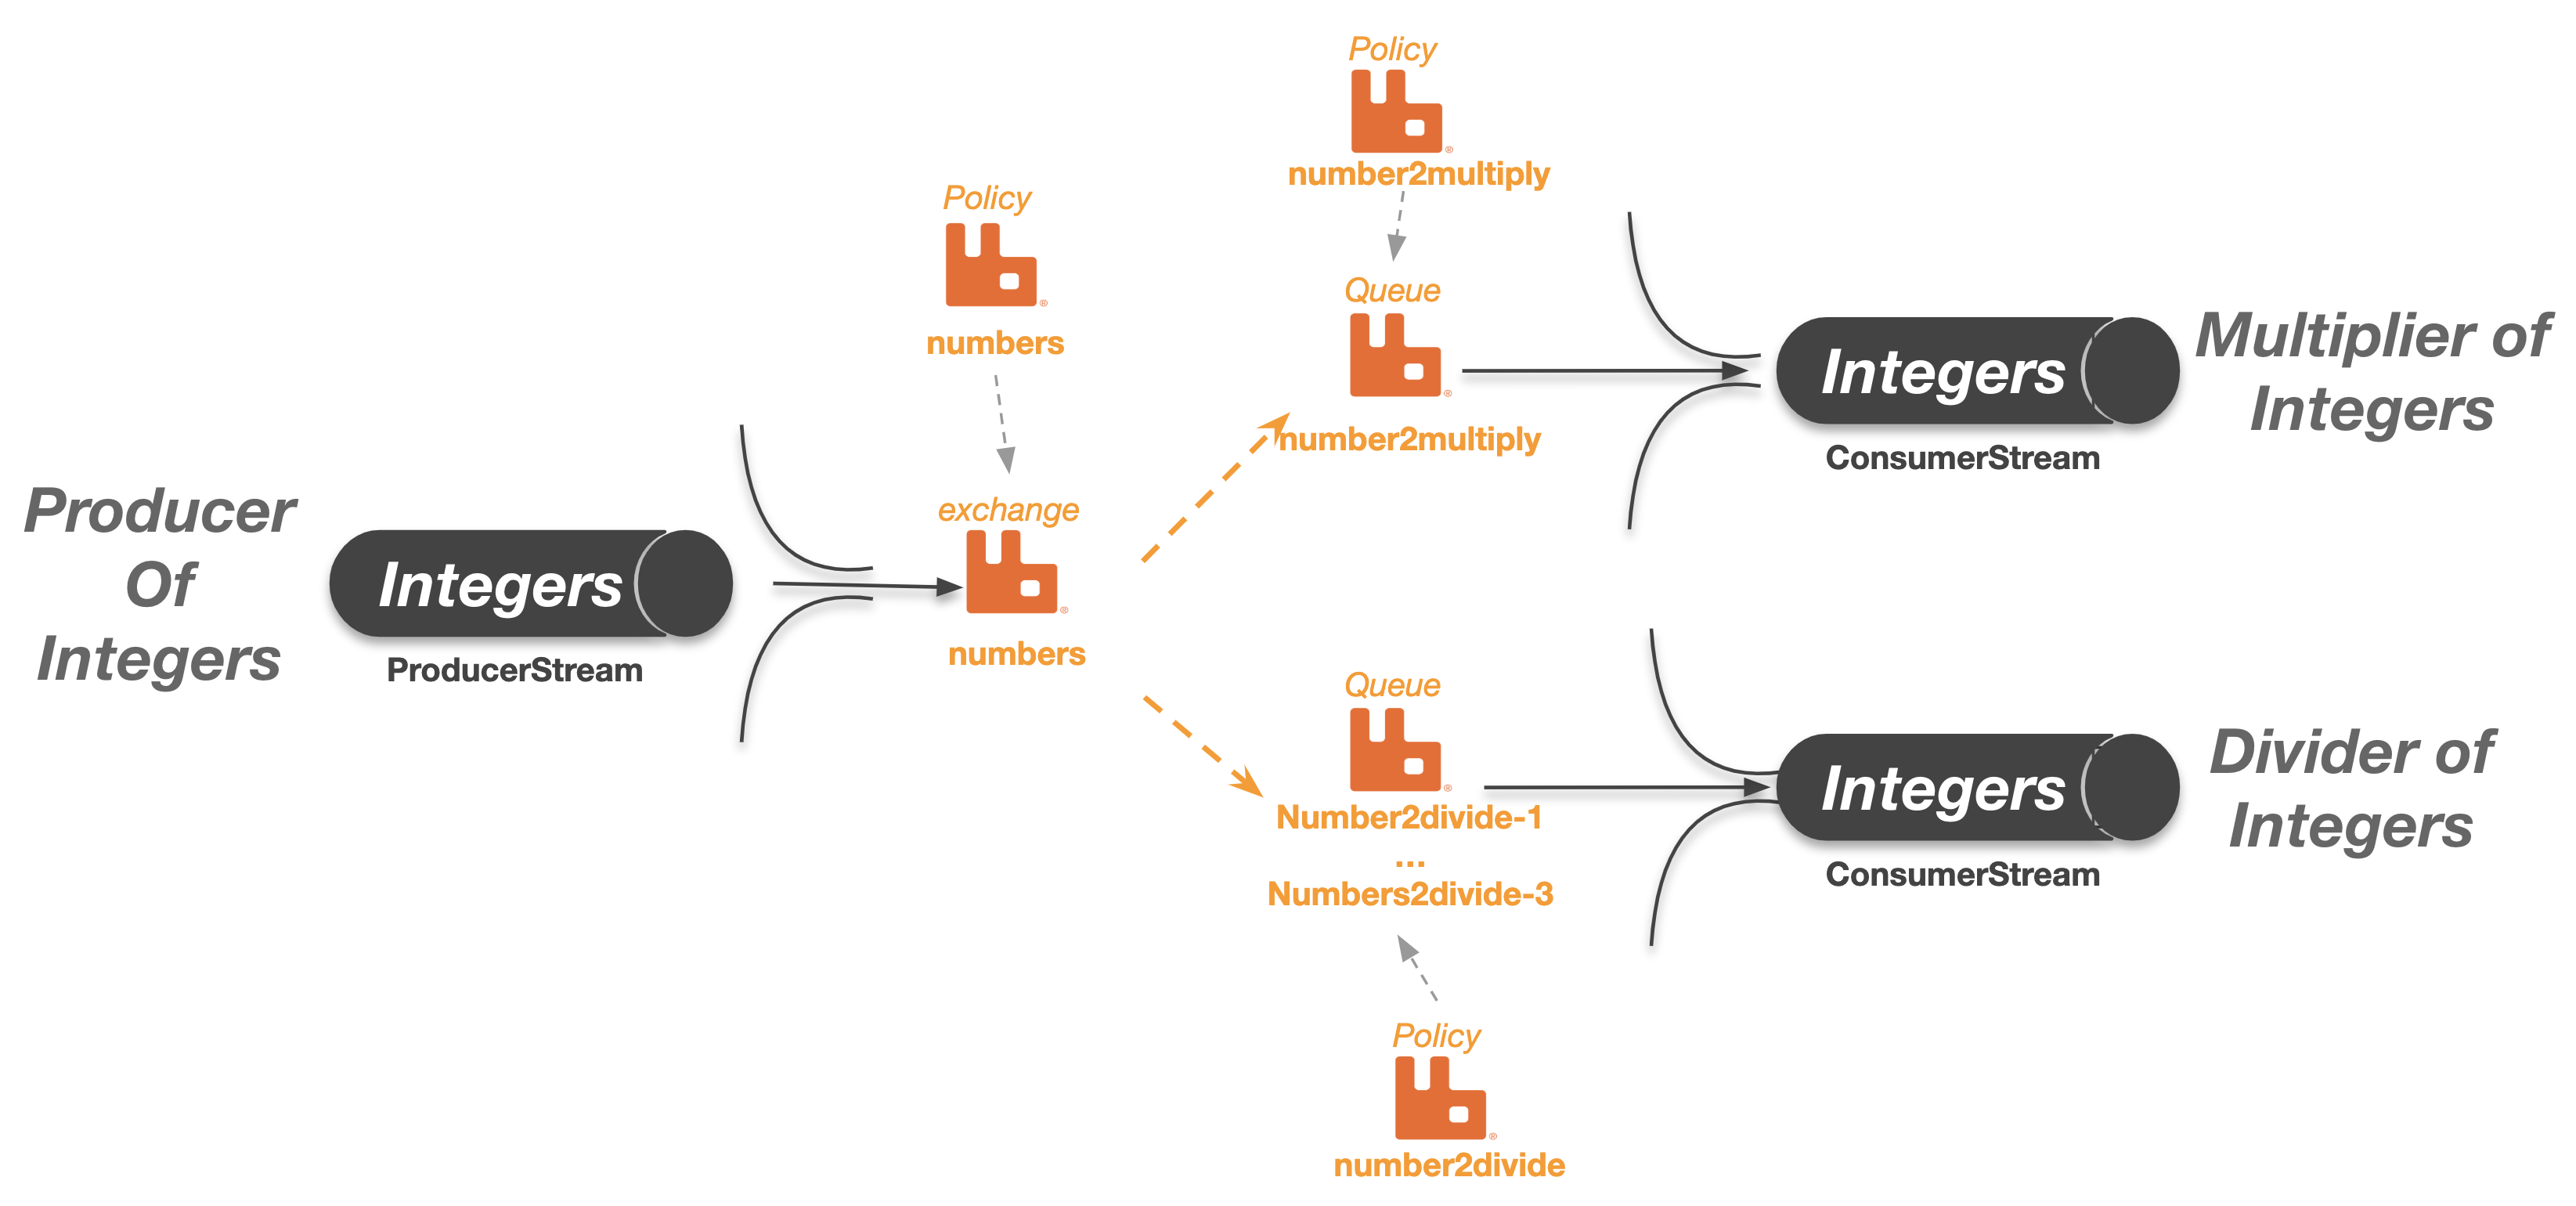
The diagram below depicts what Reactor RabbitMQ Streams is and how it works:
-
A ProducerStream transparently connects a Producer application to one or many exchange(s) depending of its routing strategy. In the diagram we have a Producer of Integers application which sends java.lang.Integer to an exchange called numbers
-
Likewise a ConsumerStream transparently connects a Consumer application to a queue (which can be a single queue or a partitioned queue made up of multiple AMQP queues). In the diagram we have two Subscriber(s) or Consumer Group(s) both receiving the same Integers sent over the numbers exchange. Each subscriber/consumer application processes the integers differently.
With Reactor RabbitMQ Streams, applications are no longer concerned with:
-
messages but with typed-safe events, e.g. OutboundMessage vs java.lang.Integer
-
fully configure queues and/or exchanges via policies, e.g. when we need to set up Dead-Letter exchange or a message-TTL
-
channels and/or connection management
-
queue partitioning via consistent hash-exchange or by other means
-
retry logic on the publisher
1.3. Reactor RabbitMQ Streams stack
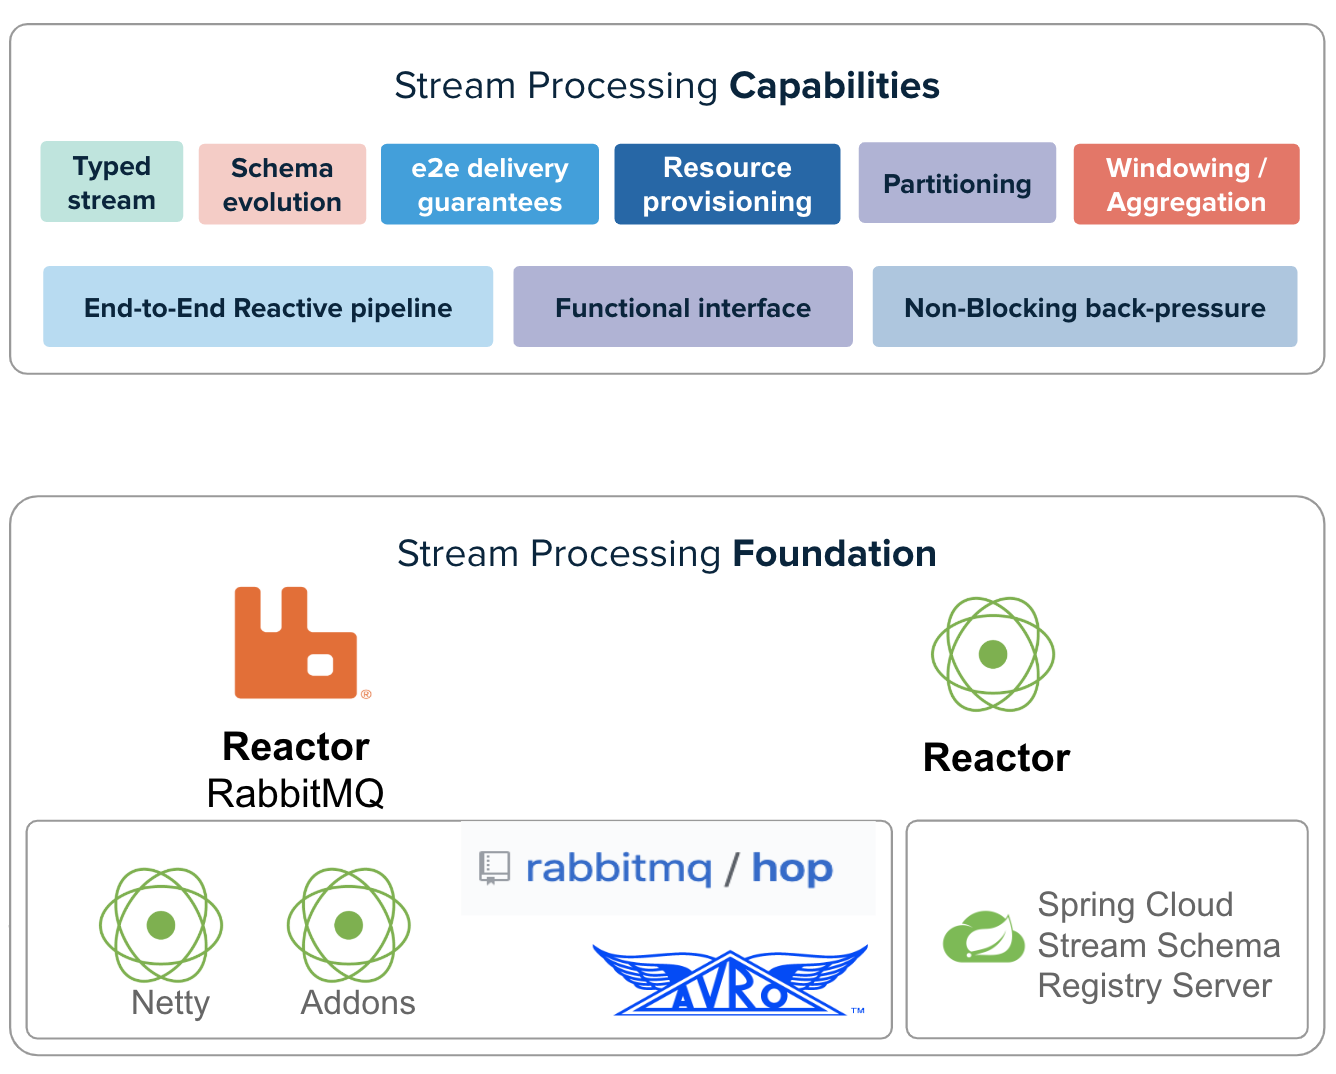
At the bottom we have the core foundation which has Reactor RabbitMQ and Project Reactor. Reactor RabbitMQ gives us access to RabbitMQ using a Reactive API. The Reactor project gives us the ability to build streaming pipelines with a rich set of operators.
However, these two core libraries together do not come yet with the core set of streaming capabilities we need to write streaming applications. Therefore, the streaming foundation includes additional libraries such as Avro in order to support typed streams with Avro as the default serialization protocol.
2. Getting Started
Learn to use Reactor RabbitMQ Streams with this linear sequence of getting started tutorials. Each tutorial builds on the concepts learnt on the previous tutorial.
Learning the basics:
Beyond the basics:
All the tutorials are Spring Boot applications and they use reactor-rabbitmq-streams-autoconfigure library
which automatically populates Spring ApplicationContext with an instance of ReactiveRabbit and RabbitEndpointService.
For non-spring boot applications, you can also learn on this tutorial how to work with it.
2.1. Requirements
-
Java JRE installed (Java 8 or later)
-
RabbitMQ 3.8.x with
rabbitmq_consistent_hash_exchange&rabbitmq_managementplugin installed
2.2. Building your own Reactor RabbitMQ Streams application
Reactor RabbitMQ Streams uses a BOM (Bill of Materials). This is a curated list of groups of artifacts that are meant to work well together, providing the relevant versions.
2.2.1. For Gradle
Prior to version 5.0, Gradle has no core support for Maven BOMs, but you can use Spring’s gradle-dependency-management plugin.
First, apply the plugin from the Gradle Plugin Portal, as follows:
plugins {
    id "io.spring.dependency-management" version "1.0.7.RELEASE" (1)
}| 1 | as of this writing, 1.0.7.RELEASE is the latest version of the plugin. Check for updates. |
For Gradle and Spring Boot Applications:
dependencyManagement {
     imports {
          mavenBom "com.pivotal.rabbitmq:reactor-rabbitmq-streams-bom:0.0.9"
     }
}
dependencies {
    implementation "com.pivotal.rabbitmq:reactor-rabbitmq-streams-autoconfigure"
}
For Gradle and non-Spring Boot Applications:
dependencyManagement {
     imports {
          mavenBom "com.pivotal.rabbitmq:reactor-rabbitmq-streams-bom:0.0.9"
     }
}
dependencies {
    implementation "com.pivotal.rabbitmq:reactor-rabbitmq-streams"
}
2.2.2. For Maven
For Maven and Spring Boot Applications:
<dependencies>
    <dependency>
        <groupId>com.pivotal.rabbitmq</groupId>
        <artifactId>reactor-rabbitmq-streams-autoconfigure</artifactId> (1)
    </dependency>
    ...
</dependencies>
<dependencyManagement>
    <dependencies>
        <dependency>
            <groupId>com.pivotal.rabbitmq</groupId>
            <artifactId>reactor-rabbitmq-streams</artifactId> (2)
            <version>0.0.9</version>
            <type>pom</type>
            <scope>import</scope>
        </dependency>
    </dependencies>
</dependencyManagement>| 1 | Add `reactor-rabbitmq-streams-autoconfigure dependency |
| 2 | And import the BOM |
For Maven and non-Spring Boot Applications:
<dependencies>
  <dependency>
      <groupId>com.pivotal.rabbitmq</groupId>
      <artifactId>reactor-rabbitmq-streams</artifactId> (1)
  </dependency>
  ...
</dependencies>
<dependencyManagement>
    <dependencies>
        <dependency>
            <groupId>com.pivotal.rabbitmq</groupId>
            <artifactId>reactor-rabbitmq-streams</artifactId> (2)
            <version>0.0.9</version>
            <type>pom</type>
            <scope>import</scope>
        </dependency>
    </dependencies>
</dependencyManagement>| 1 | Add the reactor-rabbitmq-streams dependency |
| 2 | And import the BOM |
2.3. Milestones and release candidates
With Maven:
<repositories>
  <repository>
    <id>rabbitmq-maven-milestones</id>
    <url>https://packagecloud.io/rabbitmq/maven-milestones/maven2</url>
    <releases>
      <enabled>true</enabled>
    </releases>
    <snapshots>
      <enabled>false</enabled>
    </snapshots>
  </repository>
</repositories>
With Gradle:
repositories {
  maven { url 'https://packagecloud.io/rabbitmq/maven-milestones' }
  maven {
    url 'https://repo.spring.io/libs-snapshot'
    mavenContent {
      snapshotsOnly()
    }
   }
  mavenCentral()
}
3. Getting started tutorials
Learning the basics:
Beyond the basics:
3.1. Requirements to follow the tutorials
-
Java JRE installed (Java 8 or later)
-
Maven (3.6.2 or later) to compile the tutorials
-
RabbitMQ 3.8.x running at localhost:5672 with
rabbitmq_consistent_hash_exchange&rabbitmq_managementplugins installed. -
RabbitMQ user must have policymaker permission
| There are convenient scripts to launch a single node or a 3-node cluster. |
-
Get the code for the tutorials and compile them
git clone https://github.com/MarcialRosales/reactor-rabbitmq-streams-getting-started getting-started
cd getting-started
mvn
3.2. Start single node RabbitMQ server
We recommend launching RabbitMQ with the following script so that it runs the correct RabbitMQ version (3.8.x) with the right configuration. This script requires Docker installed in your machine though.
bin/deploy-rabbit
It launches a single RabbitMQ server on the standard port 5672/15672 (guest/guest).
|
3.3. Start RabbitMQ cluster
If you prefer to use a RabbitMQ cluster, the following script launches a 3-node cluster with the right version and configuration. This script requires Docker installed in your machine though.
bin/deploy-rabbit-cluster
It launches a 3-node RabbitMQ server on ports 5673/15673 to 5675/15675.
|
3.4. Basic send and receive events
In this first tutorial, we are going to learn the basics of how to send events to RabbitMQ and how to consume them in a stream-like fashion.
Source code available here
3.4.1. Getting the skeleton of the application
This first tutorial and most of the other tutorials are Spring Boot applications. They
include reactor-rabbitmq-streams-autoconfigure dependency.
<dependency>
    <groupId>com.pivotal.rabbitmq</groupId>
    <artifactId>reactor-rabbitmq-streams-autoconfigure</artifactId>
</dependency>
By including the above dependency, we can get Reactor RabbitMQ Streams automatically instantiated, configured and injected into our applications.
@SpringBootApplication
public class BasicSendAndReceiveApplication {

        private static Logger log = LoggerFactory.getLogger(BasicSendAndReceiveApplication.class);

        @Autowired
        RabbitEndpointService rabbit;  (1)

        public static void main(String[] args) {
                SpringApplication.run(BasicSendAndReceiveApplication.class, args);
        }
}| 1 | RabbitEndpointService is the single entry-point to a RabbitMQ server/cluster. It is automatically configured to use the default configured RabbitMQ. If
there are no endpoints configured, it will use the default RabbitMQ which is locahost:5672. |
Reactor RabbitMQ Streams allows applications to connect to multiple RabbitMQ clusters.
Each RabbitMQ cluster is exposed as a RabbitEndpointService instance. Unless our
application really needs to deal with multiple endpoints, all we need to do is get a
single RabbitEndpointService injected as shown earlier.
To configure the endpoint’s settings such as hostname, port, etc. we use Spring Boot configuration.
rabbit: (1)
  default-endpoint-name: standalone (2)
  endpoints: (3)
    standalone: (4)
      port: 5672 (5)
      managementPort: 15672 (6)
    cluster:
      port: 5673
managementPort: 15673| 1 | Root of the configuration parameters for Reactor RabbitMQ Streams |
| 2 | Self explanatory, name of the default endpoint if you don’t specify one in your code and there is more than one |
| 3 | Collection of endpoints indicating different deployments |
| 4 | Name of the endpoint, you will refer to this name in the code when your application needs to connect to multiple clusters |
| 5 | Port of the RabbitMQ broker. |
| 6 | Management console port. |
The important thing to learn is that we need to get an instance of RabbitEndpointService
injected into our application and that we can configure RabbitMQ credentials to access RabbitMQ via
standard Spring Boot configuration, e.g. via application.yml.
|
| For more details about the endpoint connection configuration, check out this section. |
3.4.2. Sending events
To send events to RabbitMQ is very simple, from an RabbitEndpointService instance, we get the chance to entirely declare
the topology our application needs. A topology is nothing more than a set of RabbitMQ
resources such as Queues, Exchanges, Bindings and Policies. All we need to do is to provide a Lambda which
takes a TopologyBuilder as an argument that we use to declare our topology.
rabbit
  .declareTopology((builder) -> builder.
    .declareExchange(NUMBERS) (1)
      .type(fanout) (2)
)| 1 | Declare an exchange which by default is of type fanout |
| 2 | Explicitly set the exchange type to fanout |
Once we have declared our topology, we declare how we intend to stream the events to RabbitMQ. In this case,
we declare a ProducerStream which eventually will send all java.lang.Integer(s) to the same exchange we have
previously declared.
  .createProducerStream(Integer.class)
  .route()
    .toExchange(NUMBERS)
  .then()
The first important thing to learn is that we are sending/receiving strongly-typed events not messages.
In this case, we are streaming java.lang.Integer, and Reactor RabbitMQ Streams uses Avro serialization.
The supported primitive types are: Integer, Boolean, Byte, Double, Float, Long and String.
|
Finally, we tell the stream to send our events (streamOfDataToSend) which in our case we have built it ourselves but it may have come
from somewhere else like from a file or from another Reactor RabbitMQ Stream.
  .send(streamOfDataToSend)
  .doOnNext(data -> log.debug("Sent: {}", data))
  .blockLast();
The important thing to learn is that the .send(streamOfDataToSend) method returns a stream (i.e. Flux<Integer>) which emits
java.lang.Integer(s) which have been successfully sent. This means that we received a publisher-confirm.
However, in next tutorials, you will learn how to also consider returned events, a.k.a. unroutable events.
|
If we do not call .blockLast();, everything that we have done so far has not effect. Calling
blockLast() will execute the pipeline and block the current thread until we have sent all the events.
|
Here is the entire code that correspond to our producer role/application.
Flux<Integer> streamOfDataToSend = Flux
  .range(1, count)
  .delayElements(delay)
  .doOnNext(data -> log.debug("Sending: {}", data)); (1)

rabbit
  .declareTopology((builder) -> builder.
    .declareExchange(NUMBERS)
    .type(fanout)
  )  (2)
  .createProducerStream(Integer.class) (3)
  .route()
    .toExchange(NUMBERS)  (4)
  .then()
  .send(streamOfDataToSend)  (5)
  .doOnNext(data -> log.debug("Sent: {}", data))
.blockLast(); (6)| 1 | Prepares a stream of Integers to send |
| 2 | Declares the topology our producer application needs |
| 3 | Creates a ProducerStream of type java.lang.Integer |
| 4 | .. which routes all events to the exchange defined by the NUMBERS variable |
| 5 | .. to send the stream of Integers |
| 6 | Wait until the last Integer is emitted by stream <1> and it is successfully sent to RabbitMQ |
To run the publisher application we do it as follows.
> ./run --role=publisher
2019-12-17 15:41:07.106 DEBUG 19687 --- [     parallel-1] c.p.r.g.GettingStartedApplication        : Sending: 0
2019-12-17 15:41:07.149 DEBUG 19687 --- [   rabbitmq-nio] c.p.r.g.GettingStartedApplication        : Sent: 0
2019-12-17 15:41:17.105 DEBUG 19687 --- [     parallel-1] c.p.r.g.GettingStartedApplication        : Sending: 1
2019-12-17 15:41:17.109 DEBUG 19687 --- [   rabbitmq-nio] c.p.r.g.GettingStartedApplication        : Sent: 1
2019-12-17 15:41:27.103 DEBUG 19687 --- [     parallel-1] c.p.r.g.GettingStartedApplication        : Sending: 2
2019-12-17 15:41:27.106 DEBUG 19687 --- [   rabbitmq-nio] c.p.r.g.GettingStartedApplication        : Sent: 2
We can override the name of the exchange by passing the argument --exchange=my-exchange.
3.4.3. Receiving events
To receive events we proceed exactly as we did earlier, from an RabbitEndpointService instance, we declare our
topology.
rabbit
  .declareTopology((builder) -> builder
    .declareExchange(NUMBERS)
      .type(fanout) (1)
    .and()  (2)
    .declareQueue(CONSUMER) (3)
      .boundTo(NUMBERS) (4)
)| 1 | Declare the fanout exchange |
| 2 | Call and() so that we terminate the exchange declaration and continue with other declarations |
| 3 | Declare the queue … |
| 4 | … Bound to the exchange |
Once we have declared our topology, we declare how we intend to receive the events from RabbitMQ. In this case,
we declare a ConsumerStream which eventually subscribes to the queue we declared earlier and expects java.lang.Integer
events.
.createConsumerStream(CONSUMER, Integer.class)
ConsumerStream uses
RabbitMQ client acknowledgment however it automatically acknowledges the events as soon as they are emitted
to the pipeline so that we can process it.
|
Use ConsumerStream if you can tolerate message loss otherwise use .createTransactionConsumerStream() instead.
|
Finally, we tell the stream that we are done setting it up and that want to start receiving events.
  .receive()
  .doOnNext(number -> log.info("Received: {}", number))
  .subscribe();
If we do not call .subscribe();, everything that we have done so far has not effect. Calling
subscribe() will execute the pipeline. However, contrary to the .blockLast(), subscribe is non-blocking.
|
Here is the entire code that correspond to our consumer role/application.
rabbit
  .declareTopology((builder) -> builder
    .declareExchange(NUMBERS)
      .type(fanout)
    .and()
    .declareQueue(CONSUMER)
      .boundTo(NUMBERS)
    ) (1)
    .createConsumerStream(CONSUMER, Integer.class) (2)
    .receive() (3)
    .doOnNext(number -> log.info("Received: {}", number))
.subscribe(); (4)| 1 | Declares the topology our consumer application needs |
| 2 | Creates a ConsumerStream of type java.lang.Integer which consumes from the queue whose name is
defined in the CONSUMER variable |
| 3 | Receives events |
| 4 | Starts the stream which eventually connects to RabbitMQ, declares the topology and subscribes to the queue. |
To run the consumer application we do it as follows.
> ./run --role=consumer
2019-12-17 15:49:36.568  INFO 19772 --- [pool-3-thread-4] c.p.r.g.GettingStartedApplication        : Received: 0
2019-12-17 15:49:36.571  INFO 19772 --- [pool-3-thread-4] c.p.r.g.GettingStartedApplication        : Received: 1
2019-12-17 15:49:36.572  INFO 19772 --- [pool-3-thread-5] c.p.r.g.GettingStartedApplication        : Received: 2
2019-12-17 15:49:36.573  INFO 19772 --- [pool-3-thread-5] c.p.r.g.GettingStartedApplication        : Sum = 3
2019-12-17 15:49:36.575  INFO 19772 --- [pool-3-thread-5] c.p.r.g.GettingStartedApplication        : Received: 3
2019-12-17 15:49:36.575  INFO 19772 --- [pool-3-thread-5] c.p.r.g.GettingStartedApplication        : Received: 4
2019-12-17 15:49:36.576  INFO 19772 --- [pool-3-thread-5] c.p.r.g.GettingStartedApplication        : Received: 5
2019-12-17 15:49:36.576  INFO 19772 --- [pool-3-thread-5] c.p.r.g.GettingStartedApplication        : Sum = 12
By default, the queue is called reactive-text and the exchange reactive-text but we can override then by passing the argument
--exchange=my-exchange and --queue=my-queue.
---
3.5. Basic send and receive events using plain Java application
In the previous tutorial, we learnt the basics of sending and receiving events using a Spring Boot application. In this tutorial, we are going to learn what it takes to bootstrap ourselves Reactor RabbitMQ Streams rather than getting it automatically bootstrapped for us by Spring Boot. The basics of sending and receiving do not change.
Source code available here
3.5.1. Add dependencies in pom.xml
Non-Spring Boot application should include reactor-rabbitmq-streams dependency along with
all the transitive dependencies. This tutorial uses maven-shade-plugin
to build an executable jar with all the dependencies inside.
<dependencies>
  <dependency>
      <groupId>com.pivotal.rabbitmq</groupId>
      <artifactId>reactor-rabbitmq-streams</artifactId> (1)
  </dependency>
</dependencies>
<dependencyManagement>
  <dependencies>
      <dependency>
        <groupId>com.pivotal.rabbitmq</groupId>
        <artifactId>reactor-rabbitmq-streams</artifactId>
        <version>0.0.9</version>
        <type>pom</type>
        <scope>import</scope>
      </dependency>
    </dependencies>
</dependencyManagement>

<repositories>
        <repository>
                <id>rabbitmq-maven-milestones</id>
                <url>https://packagecloud.io/rabbitmq/maven-milestones/maven2</url>
                <releases>
                        <enabled>true</enabled>
                </releases>
                <snapshots>
                        <enabled>false</enabled>
                </snapshots>
        </repository>
</repositories>| 1 | This is the single dependency we need |
3.5.2. Bootstrap Reactor RabbitMQ Streams
We are going to bootstrap Reactor RabbitMQ Streams in the constructor.
The goal is to be build an instance of ReactiveRabbit.
RabbitEndpointService rabbit;
ReactiveRabbit reactiveRabbit; (5)

BasicSendAndReceiveApplication() {
        reactiveRabbit = ReactiveRabbitBuilder.newInstance() (1)
                .forApplication("dummy") (2)
                .withInstanceId("001") (3)
                .addDefaultRabbitEndpoint() (4)
                .build();

        rabbit = reactiveRabbit.selectDefaultEndpoint(); (6)
}| 1 | Create an instance of the builder |
| 2 | Optionally, we can set up the application name which will be used to name the connections to RabbitMQ |
| 3 | Optionally, we can set up the application instance id which will be used to name the connections to RabbitMQ |
| 4 | Add the default endpoint which uses the default RabbitMQ settings, 5672 for AMQP , 15672 for management api, and localhost. We can add as many endpoints as clusters we want to access from our application. Here we are only interested in the default endpoint |
| 5 | After calling .build() method, we have a ReactiveRabbit instance ready to use |
| 6 | We lookup an instance of the default RabbitEndpointService that we will use
in the application to declare topologies and stream data to it |
3.5.3. Streaming events
Once we have a RabbitEndpointService there is no difference in the type of application,
be it Spring Boot or plain Java. In the previous tutorial, we
learn how to do it.
For convenience, this is the producer method which will get invoked when we pass the argument --role=publisher.
public void publisher() {
  int count = 10;
  Duration delay = Duration.ofSeconds(1);

  Flux<Integer> integers = Flux
      .range(1, count)
      .delayElements(delay)
      .doOnNext(data -> log.debug("Sending: {}", data));

  ProducerStream<Integer> producerStream = rabbit
      .declareTopology(topology())
      .createProducerStream(Integer.class)
      .route()
        .toExchange(EXCHANGE)
      .then();

  producerStream
      .send(integers)
      .doOnNext(data -> log.debug("Sent: {}", data))
      .subscribe();
}
To run the publisher application we do it as follows.
> ./run --role=publisher
2019-12-17 15:41:07.106 DEBUG 19687 --- [     parallel-1] c.p.r.g.GettingStartedApplication        : Sending: 0
2019-12-17 15:41:07.149 DEBUG 19687 --- [   rabbitmq-nio] c.p.r.g.GettingStartedApplication        : Sent: 0
2019-12-17 15:41:17.105 DEBUG 19687 --- [     parallel-1] c.p.r.g.GettingStartedApplication        : Sending: 1
2019-12-17 15:41:17.109 DEBUG 19687 --- [   rabbitmq-nio] c.p.r.g.GettingStartedApplication        : Sent: 1
2019-12-17 15:41:27.103 DEBUG 19687 --- [     parallel-1] c.p.r.g.GettingStartedApplication        : Sending: 2
2019-12-17 15:41:27.106 DEBUG 19687 --- [   rabbitmq-nio] c.p.r.g.GettingStartedApplication        : Sent: 2
To run the consumer application we use ./run --role=consumer instead.
3.6. Managing topologies
Both RabbitMQ Java client and Reactor RabbitMQ API allow developers to programatically declare their
exchanges, queues and bindings. However, we know that to fully declare or configure a queue and/or an
exchange we need to declare a policy. Although we can further configure a queue/exchange via
x-<args> such as x-dead-letter-exchange, it is not really the best way to do it for reasons we are not
going to cover here.
Reactor RabbitMQ Streams allows developers to entirely define their messaging topologies by code. Once a producer or consumer application defines its topology, Reactor RabbitMQ Streams ensures the topology is declared in RabbitMQ before it starts streaming to/from it.
Reactor RabbitMQ Streams uses the management api to create/update policies in RabbitMQ which
further configures exchanges and queues. This means that the management plugin must be installed and
the RabbitMQ user must also have policymaker permission.
|
In this tutorial, we are going to learn the API for creating topologies and ways for teams to build their blue-print topologies so that developers only need to invoke or reference a topology rather than having to build one from scratch.
We will walk through variety of samples to demonstrate simple as well as advanced topologies:
Source code for these samples is available here.
3.6.1. Declare a simple topology
In the previous tutorial we learnt how to create a topology just before using it to either send or receive events.
However, developers can also declare their topologies in RabbitMQ without creating an stream to either send or receive events. This is the option we are going to use here.
@Bean
@ConditionalOnProperty(name = "role", havingValue = "plain-simple", matchIfMissing = false)
public CommandLineRunner createSimpleTopology() {

  return (args) -> {

    Topology provisionedTopology = rabbit
      .manageTopologies() (1)
      .declare(simpleTopology("plain-simple")) (2)
      .block(); (9)

    log.info("Topology provisioned\n{}", provisionedTopology);
  };

}

private Consumer<TopologyBuilder> simpleTopology(String name) { (3)

  return (builder) -> builder (4)
     .declareExchange(name) (5)
     .and() (6)
     .declareQueue(name) (7)
        .boundTo(name); (8)

}| 1 | Get access to the TopologyManager |
| 2 | Pass onto the TopologyManager.declare() method an instance of Consumer<TopologyBuilder>. |
| 3 | This method represents our topology template builder method. This template method only accepts one input parameter, the topology’s name. |
| 4 | We implement Consumer<TopologyBuilder> using Java lambda. It has just one method which
takes a single parameter of type TopologyBuilder. |
| 5 | Now, we use the TopologyBuilder to declare an Exchange whose name matches the
topology’s. name. By the way, the default exchange type is Fanout |
| 6 | Conclude the Exchange definition and prepare to add more resources |
| 7 | Declare a Queue once again named after the topology |
| 8 | Finally, bind this queue with the exchange we just declared. |
Run the application as follows:
cd getting-started/managing-topologies
./run --role=plain-simple
3.6.2. Declare a queue with Dead Letter Exchange (DLX)
Refer to this documentation for more details on concept of Dead Letter Exchange and when they are used.
The idea is simple, any rejected (i.e. nacked and not re-queued message) or evicted/expired message, is sent to a dead-letter-exchange and eventually to a dead-letter-queue so that we don’t lose it and we can recover it later. If the queue has no DLX configured, the message is lost.
Following code demonstrates how to define a DLX for a queue.
@Bean
@ConditionalOnProperty(name = "role", havingValue = "topologyWithDeadLetterExchange", matchIfMissing = false)
public CommandLineRunner topologyWithDeadLetterExchange() {

  return (args) -> {
    Topology provisionedTopology = rabbit
      .manageTopologies()
      .declare(topologyWithDLX("dlx-demo"))
      .block();

    log.info("Topology provisioned\n{}", provisionedTopology);
  };

}

private Consumer<TopologyBuilder> topologyWithDLX(String name) {
  return (builder) -> {

    String dlx = name.concat("-DLX");
    builder
      .declareExchange(name)
      .and()
      .declareQueue(name)
        .boundTo(name)
        .withDeadLetterExchange(dlx) (1)
        .withMaxLength(100, rejectPublishDlx) (2)
        .classic().withMessageTTL(Duration.ofMinutes(30)) (3)
      .and()
      .declareExchange(dlx) (4)
      .and()
      .declareQueue(dlx) (5)
        .boundTo(dlx); (6)

        };
}| 1 | Declare a queue with a DLX |
| 2 | Set the queue’s max-length to 100. When the queue is full, new messages
are sent to the configured DLX |
| 3 | Set the queue’s message-ttl to 30 minutes. Expired messages are sent
to the configured DLX
be sent to the configured DLX |
| 4 | Declare the DLX |
| 5 | Define the DLQ |
| 6 | Bind the DLQ to the DLX |
Run the application as following
cd getting-started/managing-topologies
./run --role=topologyWithDeadLetterExchange-
Use the management console e.g. localhost:15672 (guest/guest)
-
Take a look at number of messages in dlx-demo-DLX
-
Publish a message on the exchange dlx-demo
-
Read the message from queue dlx-demo, but make sure you select the
ACK mode=Reject requeue false -
Take a look at number of messages in dlx-demo-DLX queue
3.6.3. Declare partitioned queue
So far we have seen that when we declare a queue without partitions, RabbitMQ creates an
AMQP queue in RabbitMQ. However, when we declare a queue with partitions, RabbitMQ creates as
many AMQP queues in RabbitMQ as partitions plus a consistent hashing exchange that spreads messages
onto the partitioned queues. Needless to say, that the partitioned queues are bound to the
consistent hashing exchange.
As you can see, Reactor RabbitMQ Streams treats a partitioned queue as a logic queue which consists of
2 or many physical AMQP queues. When we bind our logic queue to an exchange, we are effectively
binding the consistent hashing exchange to the exchange.
Following code demonstrates how to create a partitioned queue.
@Bean
@ConditionalOnProperty(name = "role", havingValue = "topologyWithPartitions", matchIfMissing = false)
public CommandLineRunner declareTopologyWithPartitions() {

  return (args) -> {
    Topology provisionedTopology = rabbit
      .manageTopologies()
      .declare(topologyWithPartitions("partitions-demo"))
      .block();

    log.info("Topology provisioned\n{}", provisionedTopology);
  };

}

private Consumer<TopologyBuilder> topologyWithPartitions(String name) {
  return (builder) -> {

    builder
      .declareExchange(name)
      .and()
      .declareQueue(name)
        .boundTo(name)
        .withPartitions(2) (1)
        .withPartitionKeyInMessageId(); (2)

        };
}| 1 | Declare the queue with two partitions |
| 2 | Partitioning of the messages is done based on message-id property. Actual
partitioning happens on the consistent hashing exchange which then sends the messages
to the right partition of the queue. |
Run the application as follows
cd getting-started/managing-topologies
./run --role=getting-started/managing-topologies
Partitions and consumers
Reactor RabbitMQ Streams ensures that only one consumer is active on each partitioned queue. This is because partitioned queues are configured with Single Active Consumer (SAC) feature.
At present, it is not possible to enable competing consumers pattern in partitioned queues.
Reactor RabbitMQ Streams also ensures that partitions are evenly distributed between consumers from various application instances. In other words, if we have 2 application instances, one application instance will end up with 1 active consumer on partition 1, and 1 passive consumer on partition 2. And the opposite happens in the second application instance. It has 1 active consumer on partition 2, and 1 passive consumer on partition 1.
3.6.4. Highly available mirrored queue
RabbitMQ offers highly available queues a.k.a. mirrored queues. Quorum queues is another type of highly available queues which is also supported and we are covering in the next section. At a core of it, mirrored queues are replicated across different nodes of the cluster. So you will need a cluster of RabbitMQ brokers to try this tutorial.
In this tutorial, we are going to use ReactiveRabbit to choose the RabbitEndpointService we want
to use rather than using the default one. ReactiveRabbit is the single entry-point to Reactor RabbitMQ Streams API.
RabbitEndpointService is the single-entry point to a single RabbitMQ server/cluster. Whereas ReactiveRabbit
is the single entry point to the entire Reactor RabbitMQ Streams API. From it we can access other available
RabbitEndpointService(s) that we have configured in our application as we will see in this tutorial.
When we include reactor-rabbitmq-streams-autoconfigure dependency, it provides 2 @Bean(s). One is a
RabbitEndpointService which is initialized with the default endpoint. And a second one, which is ReactiveRabbit.
|
Following code demonstrates how to create mirrored queues
@Autowired
ReactiveRabbit reactiveRabbit; (1)

@Value("${cluster-endpoint:cluster}")
String clusterEndpoint; (2)

@Bean
@ConditionalOnProperty(name = "role", havingValue = "topologyWithReplicatedPartitionedQueue", matchIfMissing = false)
public CommandLineRunner declareTopologyWithReplicatedPartitionedQueue() {

  return (args) -> {
    Topology provisionedTopology = reactiveRabbit
      .selectEndpoint(clusterEndpoint) (3)
      .manageTopologies()
      .declare(topologyWithReplicatedPartitionedQueue("replicated-and-partitioned"))
      .block();

    log.info("Topology provisioned\n{}", provisionedTopology);
  };

}

private Consumer<TopologyBuilder> topologyWithReplicatedPartitionedQueue(String name) {
  return (builder) -> {

    builder
      .declareExchange(name)
      .and()
      .declareQueue(name)
        .boundTo(name)
        .withPartitions(2)
          .withPartitionKeyInMessageId()
        .and()
        .classic() (4)
          .withReplicas(1, true); (5)

  };
}| 1 | Get ReactiveRabbit bean injected |
| 2 | Member variable clusterEndpoint has the name of the endpoint we will use for this tutorial. It is loaded
from the configuration entry cluster-endpoint and defaulted to cluster |
| 3 | Use ReactiveRabbit to select the RabbitEndpointService for our cluster endpoint. |
| 4 | Declare a queue as classic (this is the default queue type) so that we can configure replication which is a feature exclusive of mirrored queues. |
| 5 | Declare the queue with 1 replica (ha-mode=exactly; ha-params=2) and automatic synchronization
(ha-sync-mode=automatic). ha-params=2 because it is 1 master queue + 1 replica/mirror. |
Run the application as follows
cd getting-started/managing-topologies
./run --role=topologyWithPartitionsAndMirrors
3.6.5. Highly available quorum queue
The quorum queue type is an alternative to durable mirrored queues (a.k.a. HA queues) purpose built for a set of use cases where data safety is a top priority.
These are the key differences of using quorum queues with regards mirrored queues:
-
Message TTL is not supported
-
Max-Length is supported but it only supports
MaxLengthStrategy.dropHead. It does not supportMaxLengthStrategy.rejectPublishorMaxLengthStrategy.rejectPublishDlx -
3 is the minimum accepted number of replicas. Any smaller number does not make much sense.
-
Number of replicas is optional. The broker defaults to a configurable number of replicas. Check the documentation for further details here.
Following code demonstrates how to create a simple topology with a quorum queue bound to an exchange.
@Bean
@ConditionalOnProperty(name = "role", havingValue = "quorum-queue", matchIfMissing = false)
public CommandLineRunner declareTopologyWithQuorumQueue() {

  return (args) -> {

    Topology provisionedTopology = rabbit.manageTopologies()
      .declare(simpleQuorumTopology("plain-quorum"))
      .block();

    log.info("Topology provisioned\n{}", provisionedTopology);
  };
}

Consumer<TopologyBuilder> simpleQuorumTopology(String name) {
  return (builder) -> builder
    .declareExchange(name)
    .and()
    .declareQueue(name).quorum().withDeliveryLimit(3) (1)
    .and()
    .boundTo(name);
}| 1 | Declare a quorum queue which redelivers a nacked/rejected message (requeue: false)
at most 3 times. For information at www.rabbitmq.com/quorum-queues.html#poison-message-handling |
Run the application as follows:
cd getting-started/managing-topologies
./run --role=quorum-queue
Quorum queues store their content on disk (per Raft requirements) as well as in memory. However, it is possible to limit how much memory a quorum queue uses using a policy.
@Bean
@ConditionalOnProperty(name = "role", havingValue = "disk-only-quorum-queue", matchIfMissing = false)
public CommandLineRunner createTopologyWitheDiskOnlyQuorumQueue() {
  return (args) -> {

    Topology provisionedTopology = rabbit
      .manageTopologies()
      .declare(quorumDiskOnlyTopology("disk-only-quorum"))
      .block();

    log.info("Topology provisioned\n{}", provisionedTopology);
  };
}

Consumer<TopologyBuilder> quorumDiskOnlyTopology(String name) {
  return (builder) -> builder
    .declareExchange(name)
    .and()
    .declareQueue(name).quorum()
      .withReplicas(3) (1)
      .withMaxInMemoryLength(0) (2)
    .and()
    .boundTo(name);
}| 1 | Declare a quorum queue with up to 3 replicas. |
| 2 | Declare a quorum queue that does not keep any messages in memory. |
Run the application as follows:
cd getting-started/managing-topologies
./run --role=disk-only-quorum-queue
We can partition quorum queues too. We proceed exactly as we did in the section Declare partitioned queue.
3.6.6. Fanout to multiple subscriber queues (a.k.a. consumer group)
You will often have a need to broadcast events to multiple subscribers queues. However, every subscriber queue will only get the messages published after the queue was bound to the exchange.
The following code demonstrates how to create a fanout exchange with multiple subscriber queues.
| It is unrealistic to find this code in any production code because each subscriber application will declare its own topology. Whereas in this sample code we are declaring all 3 subscriber queues. |
@Bean
@ConditionalOnProperty(name = "role", havingValue = "topologyWithFanoutToMultipleConsumers", matchIfMissing = false)
public CommandLineRunner declareTopologyWithFanoutToMultipleConsumers() {

  String name  = "fanout-to-multiple-consumers";
  return (args) -> {
    Topology provisionedTopology = rabbit
      .manageTopologies()
      .declare(topologyWithFanout(name) (3)
          .andThen(subscriberOf(name, "consumer-1"))
          .andThen(subscriberOf(name, "consumer-2"))
          .andThen(subscriberOf(name, "consumer-3")))
      .block();

    log.info("Topology provisioned\n{}", provisionedTopology);
  };

}
private Consumer<TopologyBuilder> topologyWithFanout(String name) { (1)
  return (builder) -> {
    builder
      .declareExchange(name)
        .type(fanout);
  };
}
private Consumer<TopologyBuilder> subscriberOf(String exchange, String name) { (2)
  return (builder) -> {
    builder
      .declareQueue(String.format("%s-%s", exchange, name))
      .boundTo(exchange);
  };
}| 1 | topology template builder method that declares an exchange of type fanout |
| 2 | topology template builder method that declares a subscriber queue. It accepts two
template parameters: the name of the queue and the exchange to bind the queue to. |
| 3 | Combine all the template builder method(s) to produce the entire topology with 3 subscriber queues |
Run the application as follows
cd getting-started/managing-topologies
./run --role=topologyWithFanoutToMultipleConsumers-
Use the management console e.g. localhost:15672 (guest/guest)
-
Publish a message on exchange fanout-to-multiple-consumers
-
Check messages on queues
-
fanout-to-multiple-consumers-Consumer1
-
fanout-to-multiple-consumers-Consumer2
-
fanout-to-multiple-consumers-Consumer3
-
3.6.7. Multicast routing to multiple subscribers queues based on Topic exchange
A publisher application may generate different category of events, however not every consumer is interested in every category. Topic exchanges help in these scenarios by routing events based on the event’s routing key which contains the event’s category.
Topic exchanges route messages to queues based on wildcard matches between the routing key and the routing pattern, which is specified by the queue binding. Messages are routed to one or more queues based on a matching between a message routing key and this pattern.
-
* (star) can substitute for exactly one word
-
# (hash) can substitute for zero or more words
Following code demonstrates how to build topic exchange topology
@Bean
@ConditionalOnProperty(name = "role", havingValue = "topicExchangeTopology", matchIfMissing = false)
public CommandLineRunner declareTopicExchangeTopology() {
  return (args) -> {
    Topology provisionedTopology = rabbit
      .manageTopologies()
      .declare(topicExchangeTopology("topic-exchange-topology"))
      .block();

    log.info("Topology provisioned\n{}", provisionedTopology);
  };
}

private Consumer<TopologyBuilder> topicExchangeTopology(String name) {
  return (builder) -> {
    builder
      .declareExchange(name)
        .type(topic) (1)
      .and()
      .declareQueue(name.concat("-for-inventory")) (2)
        .boundTo(name, "#.inventory") (3)
      .and()
      .declareQueue(name.concat("-for-shipping")) (4)
        .boundTo(name, "#.shipping"); (5)
  };
}| 1 | Declare topic exchange (com.pivotal.rabbitmq.topology.ExchangeType.topic is statically imported) |
| 2 | Declare a queue for inventory events. |
| 3 | Bind inventory queue to the exchange with routing key pattern #.inventory.
This means any event with routing key ending in .inventory will be published to this queue. |
| 4 | Declare a queue for shipping events. |
| 5 | Bind shipping queue to the exchange with routing key pattern #.shipping. This means
any event with routing key ending in .shipping will be published to this queue. |
Run the application as follows
cd getting-started/managing-topologies
./run --role=topologyWithContentBasedRouting-
Use the management console e.g. localhost:15672 (guest/guest)
-
Publish a few messages on exchange topic-exchange-topology using Routing key value .inventory or any string such as nyc.inventory that ends with .inventory.
-
Publish a few messages on exchange topic-exchange-topology using Routing key value .shipping or any string such as nyc.shipping that ends with .shipping.
-
Verify queues topic-exchange-topology-for-inventory and topic-exchange-topology-for-shipping for messages.
3.6.8. Alternate route for unroutable messages
How do you prevent message loss when there is no consumer for the published events?
Unless there is a consumer queue bound to an exchange, any message published onto the exchange is lost. Alternate exchange helps in these scenarios. Another option is to configure publisher to retry unroutable events as we will learn in in future tutorials.
In this example we will build a topology attaching an alternate exchange (which will have its own consumer queues) to an exchange without any queue bound to it.
Following code demonstrates how to build topology with alternate exchange
@Bean
@ConditionalOnProperty(name = "role", havingValue = "topologyWithAlternateExchange", matchIfMissing = false)
public CommandLineRunner declareTopologyWithAlternateExchange() {
  return (args) -> {
    Topology provisionedTopology = rabbit
      .manageTopologies()
      .declare(topologyWithAlternateExchange("ae-topology"))
      .block();

    log.info("Topology provisioned\n{}", provisionedTopology);
  };
}

private Consumer<TopologyBuilder> topologyWithAlternateExchange(String name) {
  return (builder) -> {
    String alternate = name.concat("-AE"); (1)
    builder
      .declareExchange(name) (2)
        .withAlternateExchange(alternate) (3)
      .and()
      .declareExchange(alternate) (4)
      .and()
      .declareQueue(alternate) (5)
        .boundTo(alternate); (6)
  };
}| 1 | Name of the alternate exchange, ae-topology-AE, we will use here. |
| 2 | Declare the main exchange, ae-topology, where you expect business events. |
| 3 | Add configuration for ae-topology, in this instance configure it with alternate exchange ae-topology-AE |
| 4 | Declare exchange ae-topology-AE. |
| 5 | Declare queue ae-topology-AE. |
| 6 | Bind queue ae-topology-AE with exchange ae-topology-AE |
Run the application as follows
cd getting-started/managing-topologies
./run --role=topologyWithAlternateExchange-
Use the management console e.g. localhost:15672 (guest/guest).
-
Select exchange ae-topology, check that there are no queues bound to it.
-
There should be a policy x-ae-topology in the Policy section, click on it and see how it is defined.
-
Check exchange ae-topology-AE, queue ae-topology-AE is bound to it.
-
Check queue ae-topology-AE, it should have the messages you published on exchange ae-topology.
3.6.9. Multilayered topology
RabbitMQ allows you to build complex routing topologies which involves chaining multiple exchanges.
This type of topology becomes very handy when we want to support subscribers with a wide variety of message selection criteria.
For instance, let’s say we have an application that sends shipment events and the following subscriber applications:
-
a subscriber which needs to get all events for auditing purposes (e.g. it forwards them to a centralized logging solution such as ELK)
-
a subscriber which is only interested in urgent shipment events
-
a subscriber which is only interested in a subset of shipment events which matches a criteria that involves several message’s attributes
-
a subscriber which is interested on receiving in one queue a subset of events which matches certain criteria and in another queue the rest of the events
From the requirements above, we identify 4 types of possible exchanges in the topology:
-
fanout for the first subscriber,
-
topic for the second (if we can encode the shipment category into a single value like a routing key),
-
header for the third subscriber
-
and alternate exchange that although it is not an exchange per se, it allows us to implement an if_else type of routing
This could be a sample topology for our use case:
  <shipment:fanout>-+-<shipment-t:topic>------+-(legal.#)-------->[legal-events]
            |       |                         +-(procurement,#)-->
            |       |
            |       +--<shipment-h:header>-----(category_2=urgent,
            |                                   category_1=announcement,
            |                                   transport=train)---->[urgent-train-announcements]
            |
            +-----[shipment-audit]
            |
            +-----<carrier:topic>-----(*.urgent.#)--->[carrier-urgent-shipments]
                      |
                    (alternate-exchange)
                      |
                    <carrier-non-urgent:fanout>--------->[carrier-non-urgent-shipments]
The routing rules are the following:
-
Message must carry a routing Key. The routing key carries the overall shipment category which conforms to this format: <event_type>.<urgent|normal>
-
Message must carry the following headers:
-
category_1
-
category_2
-
transport
-
-
Message must also carry, at the very least, the following properties:
-
message_id
-
contentType
-
Following code demonstrates how to build the entire topology by merging the topology required by the core shipment topology owned by the producer of shipment events and the topology required by the individual subscriber applications.
| For demonstration purposes we merge all the topologies. In production, each subscriber declares its own topology as demonstrated on the respective template builder method(s) for each subscriber we are going to see in the next sample code. |
@Bean
@ConditionalOnProperty(name = "role", havingValue = "shipmentTopology", matchIfMissing = false)
public CommandLineRunner declareShipmentTopology() {
  return (args) -> {
    Topology provisionedTopology = rabbit
        .manageTopologies()
        .declare(shipmentTopology() (1)
            .andThen(legalEventSubscriberTopology())  (2)
            .andThen(urgentTrainAnnouncementsSubscriberTopology()) (3)
            .andThen(auditSubscriberTopology()) (4)
            .andThen(carrierSubscriberTopology())) (5)
        .block();

    log.info("Topology provisioned\n{}", provisionedTopology);
  };
}| 1 | declare the core shipment topology owned by the producer application |
| 2 | declare the topology required by the subscriber of legal event |
| 3 | declare the topology required by the subscriber of urgent train announcements |
| 4 | declare the topology required by the auditor |
| 5 | declare the topology required by the carrier |
The core shipment topology consists of 1 root fanout exchange chained with 2 exchanges of type topic and header.
@Bean
public Consumer<TopologyBuilder> shipmentTopology() {
  return (builder) -> {
    String shipments = "shipments";
    builder
        .declareExchange(shipments)
          .type(fanout)
        .and()
        .declareExchange(shipments.concat("-t"))
          .type(topic)
          .boundTo(shipments)
        .and()
        .declareExchange(shipments.concat("-h"))
          .type(headers)
          .boundTo(shipments)
        ;
  };
}
The audit subscriber topology is fairly trivial, just a queue bound to the root exchange.
Consumer<TopologyBuilder> auditSubscriberTopology() {
  return (builder) -> {
    String subscriber = "shipment-audit";
    String shipments = "shipments";
    builder
        .declareQueue(subscriber)
        .boundTo(shipments)
    ;
  };
}
The legal event subscriber topology is also fairly trivial, just a queue but bound to the topic exchange with its appropriate binding key.
Consumer<TopologyBuilder> legalEventSubscriberTopology() {
  return (builder) -> {
    String subscriber = "legal-events";
    String shipments = "shipments-t";
    builder
        .declareQueue(subscriber)
          .boundTo(shipments, "legal.#", "procurement.#") (1)
    ;
  };
}| 1 | bind to the topic shipment-t exchange with 2 binding keys one to receive
legal events and another to receive procurement events. |
The urgent train announcement subscriber topology is also fairly trivial, just a queue but bound to the header exchange with its own message selector.
Consumer<TopologyBuilder> urgentTrainAnnouncementsSubscriberTopology() {
  return (builder) -> {
    String subscriber = "urgent-train-announcements";
    String shipments = "shipments-h";
    builder
        .declareQueue(subscriber)
          .boundTo(shipments, MessageSelector
              .matchAll()
              .of("category_2", "urgent")
              .of("category_1", "announcement")
              .of("transport", "train"))
    ;
  };
}
And the carrier subscriber topology is more complex because it builds an if-else routing topology.
Consumer<TopologyBuilder> carrierSubscriberTopology() {
  return (builder) -> {
    String subscriber = "carrier";
    String subscriber_non_urgent = "carrier-non-urgent";
    String shipments = "shipments";
    builder
        .declareExchange(subscriber) (1)
          .type(topic)
          .boundTo(shipments) (2)
          .withAlternateExchange(subscriber_non_urgent) (3)
        .and()
        .declareExchange(subscriber_non_urgent) (4)
          .type(fanout)
        .and()
        .declareQueue(subscriber.concat("-urgent-shipments")) (5)
          .boundTo(subscriber, "*.urgent.#")
        .and()
        .declareQueue(subscriber.concat("-non-urgent-shipments")) (6)
          .boundTo(subscriber_non_urgent)
    ;
  };
}| 1 | declare the root exchange for this topology, called carrier, of type topic because we want to
use a message selector based on the routing key |
| 2 | bind the root exchange to the root exchange of the shipment topology |
| 3 | configure our root exchange with an alternate exchange so that all events which are
not urgent (e.g, normal) are routed to this alternate exchange |
| 4 | declare the alternate exchange which receives non urgent shipments |
| 5 | declare the queue that will get all urgent shipment events bound to the root exchange of this
topology called carrier |
| 6 | and declare the queue that will get all non urgent shipment events bound to the
alternate exchange we created at step 4. |
-
Publish message with routing key legal.normal. It should go to these queues:
-
shipment-audit
-
legal_events
-
carrier-non-urgent-shipments
-
-
Publish message with routing key legal.urgent. It should go to these queues:
-
shipment-audit
-
legal_events
-
carrier-urgent-shipments
-
-
Publish message with routing key announcement.urgent and message headers transport=train, category_1=announcement & category_2=urgent. It should go to these queues:
-
shipment-audit
-
urgent-train-announcements
-
carrier-urgent-shipments
-
Following code demonstrates how to build shipments producer application which is compliant with the the routing rules this topology imposes.
@Bean
        @ConditionalOnProperty(name = "role", havingValue = "publishShipmentEvents", matchIfMissing = false)
        public CommandLineRunner publishShipmentEvents( (8)
                        @Qualifier("shipmentTopology")Consumer<TopologyBuilder> shipmentTopology)  {

                return (args) -> {

      rabbit
        .declareTopology(shipmentTopology) (1)
        .createProducerStream(Shipment.class) (2)
        .route()
          .toExchange("shipments")  (3)
          .withRoutingKey(routingKey()) (4)
          .and()
        .withAttributes()
          .messageId(messageId()) (5)
          .header("category_1", category1()) (6)
          .header("category_2", category2())
        .then()
        .send(shipments)  (7)
        .doOnNext((data) -> log.info("Sent {}", data))
        .blockLast()

}| 1 | declare just the topology required by the producer |
| 2 | create the stream that expects Shipment(s) |
| 3 | route all shipment events to the same exchange |
| 4 | configure how the event’s routing key is determined from a shipment event |
| 5 | configure how the event’s message_id is determined from a shipment event |
| 6 | configure how the event’s headers category_1 & category_2 are determined from a shipment event |
| 7 | send the stream of shipment events. See below how we built it. |
| 8 | topology builder is built by the event shipmentTopology() we saw earlier as a Spring @Bean
and it is injected it here as an argument |
Lets build an stream of 4 shipment events:
Shipment.Builder builder = Shipment.newBuilder();

Flux<Shipment> shipments = Flux
  .just(builder
    .setId("1")
    .setCategory1("legal").build(),
  builder
    .setId("2")
    .setCategory1("legal")
    .setCategory2("urgent").build(),
  builder
    .setId("3")
    .setCategory1("procurement")
    .setCategory2("normal").build(),
  builder
    .setId("4")
    .setCategory1("announcement")
    .setCategory2("urgent")
    .setTransport("train").build()
);
Run the following command to execute this producer application:
cd getting-started/managing-topologies
./run --role=publishShipmentEvents
3.6.10. Declare topologies passively
In certain environments applications are not allowed to declare queues and/or exchanges by themselves. Nevertheless, we still want applications to passively declare the resources they need so that streams are only opened once those resources exists.
| If a queue is passively declared; all the declared bindings are ignored as well as its policy -if any is required. For instance, if we declared a queue as passive with a TTL and bound to an exchange; the stream will be opened provided the queue exists. The binding is ignored and the queue’s policy that configures the TTL is also ignored. |
| If an exchange is passively declared; all the declared bindings are ignored as well as its policy -if any is required. For instance, if we declared an exchange as passive bound to another exchange and with an alternate exchange; the stream will be opened provided the exchange exists. The binding is ignored and the exchange’s policy that configures the alternate exchange is also ignored. |
To declare a resource passively, we can either declare our entire topology passively like shown below:
rabbit
  .selectDefaultEndpoint()
  .declareTopologyPassively(b -> b.declareExchange("my-exchange")) (1)
.createProducerStream(String.class) (2)| 1 | declare my-exchange passively |
| 2 | stream is not created until the exchange exists in RabbitMQ |
Or we can declare passively some resources but not all.
rabbit
  .selectDefaultEndpoint()
  .declareTopology(b -> b
     .declareExchange("my-exchange").passive(true) (1)
     .and()
     .declareQueue("my-queue").boundTo("my-exchange") (2)
  )
.createProducerStream(String.class) (3)| 1 | declare my-exchange passively |
| 2 | declare my-queue |
| 3 | stream is not created until my-exchange exists in RabbitMQ and we have
declared my-queue |
Resilient applications
What should we do if a passively declared resource does not exist? We have 2 choices.
If we want to fail-fast and terminate the application we configure Reactor RabbitMQ Streams endpoint as follows:
rabbit:
  default-endpoint-name: standalone
  endpoints:
    standalone:
      topology:
retryMax: 0 (1)| 1 | never retry in case of topology errors |
In the contrary, we can make our application more resilient and wait until the resource is available.
rabbit:
  default-endpoint-name: standalone
  endpoints:
    standalone:
      topology:
        timeout: 1h (1)
        randomBackoff:
          firstBackoff: 1s (2)
maxBackoff: 10s (3)| 1 | Wait until 1h before giving up (default value) |
| 2 | First retry attempt after 1 second (default value) |
| 3 | Next retry attempts between 1 and 10 seconds (default value) |
3.7. Send events reliably
In this second tutorial, we are going to learn how to send events in a reliable manner, and that means, with the following guarantees:
-
that in case of negative publisher confirmation, the event is retried with certain delay between attempts
-
that events are successfully sent to at least one queue, i.e. it was routed
-
that if RabbitMQ could not route the event (i.e. the event was returned), the event is retried
-
or if we do not want to slow down our producer in case of un-routable events, we should be able to easily configure an alternate exchange.
Source code available here
3.7.1. Guarantee events are successfully sent else retried
Passing our stream of events to the ProducerStream.send() method will always send them with publisher confirms. And more
importantly, it will always retry those which are nacked by RabbitMQ. We can adjust the delay between retry attempts.
ProducerStream does not support sending without publisher confirms, a.k.a. fire and forget. Although it has the method
sendAndForget it throws UnsupportedOperationException.
|
| To simulate negative publisher confirms we are going to set a www.rabbitmq.com/maxlength.html(maximum length) on the queue so that when it reaches the maximum it starts rejecting any publish attempt. |
rabbit
  .declareTopology((b) -> b
    .declareExchange("retryNackedEvents")
      .type(fanout)
    .and()
    .declareQueue("retryNackedEvents")
      .boundTo("retryNackedEvents")
      .withMaxLength(1)
        )    (1)
  .createProducerStream(Integer.class)
  .route()
    .toExchange("retryNackedEvents")
    .and()
  .whenNackByBroker()
    .alwaysRetry(Duration.ofSeconds(5))  (2)
  .then()
  .timeout(Duration.ofSeconds(delay.getSeconds()*10)) (3)
.blockLast();| 1 | declare topology with a queue which accepts at most 1 event |
| 2 | explicitly configure the retry interval for nacked events |
| 3 | the operator timeout allows us to terminate the pipeline if we do not receive any event in certain
amount of time |
Full source code is here.
Let’s test our sender when RabbitMQ cannot send the events. It will manage to send the first event and then it retries the next event.
> ./run --role=retryNackedEvents

2020-02-04 14:43:34.167 c.p.r.g.ReliableSendApplication          Sending: 1
2020-02-04 14:43:34.187 c.p.r.s.OutboundMessageSubscriber        Scheduling for send producer.Integer:1
2020-02-04 14:43:34.192 c.p.r.s.OutboundMessageSubscriber        track:false returned:false acked:false
2020-02-04 14:43:34.193 c.p.r.s.OutboundMessageSubscriber        Scheduling for resend producer.Integer:1. Reason: nacked
2020-02-04 14:43:34.193 c.p.r.s.P.p.Integer                      Delaying message [producer.Integer:1] due to nacked.  Redelivery:2
2020-02-04 14:43:36.198 c.p.r.s.OutboundMessageSubscriber        track:false returned:false acked:false
2020-02-04 14:43:36.198 c.p.r.s.OutboundMessageSubscriber        Scheduling for resend producer.Integer:1. Reason: nacked
2020-02-04 14:43:36.198 c.p.r.s.P.p.Integer                      Delaying message [producer.Integer:1] due to nacked.  Redelivery:3
The application terminates after 50 seconds running because of the timeout operator we set in the pipeline.
|
3.7.2. Guarantee events are successfully routed else retried
By default, a ProducerStream will always ignore returned events, a.k.a. unroutable events.
To configure our stream to always retry them we have to explicitly set the stream to do so.
| To simulate unroutable events we are going to declare a topology without any queue bound. |
rabbit
  .declareTopology((b) -> b.declareExchange("retryUnroutableEvents").type(fanout)) (1)
  .createProducerStream(Integer.class)
  .route()
    .toExchange("retryUnroutableEvents")
    .and()
  .whenUnroutable()
    .alwaysRetry(Duration.ofSeconds(5))  (2)
  .then()
  .timeout(Duration.ofSeconds(delay.getSeconds()*10)) (3)
.blockLast();| 1 | declare topology with just one exchange and not queue bound to it |
| 2 | explicitly configure the retry interval for unroutable events |
| 3 | the operator timeout allows us to terminate the pipeline if we do not receive any event in certain
amount of time |
Let’s test our sender when RabbitMQ cannot route the event
> ./run --role=retryUnroutableEvents
2020-02-04 14:54:51.504 c.p.r.g.ReliableSendApplication          Sending: 1
2020-02-04 14:54:51.525 c.p.r.s.OutboundMessageSubscriber        Scheduling for send producer.Integer:1
2020-02-04 14:54:51.530 c.p.r.s.OutboundMessageSubscriber        track:true returned:true acked:true
2020-02-04 14:54:51.530 c.p.r.s.OutboundMessageSubscriber        Scheduling for resend producer.Integer:1. Reason: returned
2020-02-04 14:54:51.530 c.p.r.s.P.p.Integer                      Delaying message [producer.Integer:1] due to unroutable.  Redelivery:2
3.7.3. Guarantee unroutable events are successfully routed to an alternate exchange
In cases where we do not want to loose events but we do not want to block producers we
opt to send them to an alternate route. For that, we configure the ProducerStream to route them to
an alternate exchange. Additionally, we are going to declare the alternate exchange and a queue in
our topology.
| To improve readability and maintenance of our pipelines, it is recommended to reactor the topology building logic to a method like shown in the sample below. |
private Consumer<TopologyBuilder> exchangeWithAlternate(String exchange, String ae) {
  return (b) -> b
      .declareExchange(ae)
        .type(fanout)
      .and()
      .declareQueue(ae)
        .boundTo(ae)
      .and()
      .declareExchange(exchange)
        .type(fanout)
        .withAlternateExchange(ae); (1)
}| 1 | Declare the exchange with an alternate exchange that we have previously declared |
rabbit
  .declareTopology(exchangeWithAlternate(exchange, ae)) (1)
  .createProducerStream(Integer.class)
  .route()
    .toExchange(exchange)
  .and()
  .whenUnroutable()
    .useAlternateExchange() (2)
        .then()
  .send(streamOfDataToSend)
  .timeout(Duration.ofSeconds(delay.getSeconds()*10)) (3)
.blockLast();| 1 | Declare topology |
| 2 | Explicitly manifest that we expect events to be routed to an alternate exchange. At present, there is
no difference between calling this method or .ignore() which is the default value. However, in the future,
this method will enforce that the exchange has an alternate exchange otherwise fail to send the event. |
Let’s test our sender when RabbitMQ cannot route the event
> ./run --role=detourUnroutableEventsCheck in the management ui the depth of the alternate queue grows as we send events.
3.7.4. Guarantee events which cannot be serialized are rejected otherwise pipeline is terminated
In order to send an event, we have to place it into an AMQP message. To do that we need to
serialize the event’s payload into byte array. Then we need to invoke the routing functions
configured in the stream to determine the exchange and routing key. If the stream has additional
functions for BCC, or CC headers, for message attributes such as message_id or
custom headers, those functions are invoked.
All these function calls, including the codec.encode(), may throw exceptions. These
exceptions are handled now and we have the choice to reject the transaction or either propagate
the exception and terminate the pipeline. The former is the default behaviour.
---
3.8. Consume events reliably
In this third tutorial, we are going to learn how to receive events in a reliable manner, and that means, with the following guarantees:
-
that events are only acked after the application has successfully processed them
-
that events are also acked after the application has decided to filter them out
-
that events which are waiting to be committed are not lost if pipeline terminates abruptly
-
that illegal events are always rejected (i.e. nacked but not requeued) but not necessarily lost
-
that we can choose to terminate the stream when an illegal event arrives returning the event to the queue
Illegal events, a.k.a. Poisonous events, corresponds to events which cannot be decoded from the message carrier. Possible reasons are:
-
missing
contentTypemessage property -
missing body or empty
-
unknown schema for the
contentType -
mismatch between event’s type and the expected type
Source code available here
3.8.1. Guarantee events are only acked after the application has successfully processed them
We learnt in previous tutorials that ConsumerStream will automatically ack the events.
Therefore, applications have no way to control when to ack them.
To be able to control when we want to ack an event we need to use TransactionalConsumerStream.
See the following code to learn how it works.
Flux<Transaction<Integer>> receivedNumbers = rabbit
  .declareTopology(topology(name))
  .createTransactionalConsumerStream(name, Integer.class) (1)
  .receive(); (2)

receivedNumbers
  .doOnNext(txNumber -> {
    Integer number = txNumber.get();  (3)
    // process it
  })
.subscribe(Transaction::commit); (4)| 1 | Create a transactional consumer stream |
| 2 | receive() returns a stream of Transaction<Integer> rather than a `Flux<Integer> |
| 3 | Applications can get the number (i.e. business object) within the transaction and process it |
| 4 | As soon as we have successfully processed the event we commit the transaction which will eventually ack the event. In this sample, we decided to commit the transaction at the very end of the pipeline. |
The most important thing to learn is that by calling Transaction::commit the
application is declaring that it has finished processing the event and hence we can ack it in RabbitMQ.
However, the event is not immediately acked. Instead, events are acked in batches as it is far more efficient
than acking one event at a time. We can adjust the ack window size and duration by calling .ackEvery(size,duration)
in the stream before calling .receive(). Once the window closes, which happens when it is full
or when its duration elapsed, all acked events are "effectively" acked in RabbitMQ.
|
Let’s test our consumer which sends 10 numbers and expects to receive those 10 numbers.
> ./run --role=reliableConsumer3.8.2. Guarantee events are also acked after the application has decided to filter them out
Why is this situation any different from the previous one? The reason is because if we
use the Flux.filter operator to filter events, this operator literally drops events and the next
stages in the pipeline do not get them. As a consequence, .subscribe(Transaction::commit) never
receives the filtered out events.
To handle filtered out events, we have to add the operator Flux.onDiscard.
rabbit
  .declareTopology(topology(name))
  .createTransactionalConsumerStream(name, Integer.class)
  .receive()
  .filter(txNumber -> txNumber.get().longValue() % 2 == 0)  (1)
  .doOnDiscard(Transaction.class, Transaction::commit)    (2)
  .doOnNext(txNumber -> log.debug("Received: {}", txNumber.get()))
  .subscribe(txNumber -> {
          txNumber.commit(); (3)
          expectedMessage.countDown();
})| 1 | Accept even numbers and skip, or filter out, odd numbers |
| 2 | Filtered out events are handled here. We want to commit them so that they are removed from the queue |
| 3 | Accepted numbers are committed here |
Let’s test our consumer which sends 10 numbers and expects to receive all 10 numbers but only 5 are actually processed.
> ./run --role=reliableSkippingConsumer
2020-02-04 19:09:52.617 c.p.r.g.ReliableReceiveApplication       Emitting: 1
2020-02-04 19:09:52.645 c.p.r.g.ReliableReceiveApplication       Sent: 1
2020-02-04 19:09:57.644 c.p.r.g.ReliableReceiveApplication       Emitting: 2
2020-02-04 19:09:57.652 c.p.r.g.ReliableReceiveApplication       Received: 2
2020-02-04 19:09:57.655 c.p.r.g.ReliableReceiveApplication       Sent: 2
2020-02-04 19:10:02.649 c.p.r.g.ReliableReceiveApplication       Emitting: 3
2020-02-04 19:10:02.657 c.p.r.g.ReliableReceiveApplication       Sent: 3
3.8.3. Guarantee that events which are waiting to be committed are not lost if pipeline terminates abruptly
This guarantee is actually given by RabbitMQ itself. In other words, as long as we do not ack an message, if the consumer and/or connection closes, the message is not lost but the contrary, it is delivered again to another consumer. As we know, RabbitMQ will deliver to our application as many messages as the prefetch size which we can adjust in our Consumer stream. For instance, if we configure our stream with a prefetch of 10, we are telling RabbitMQ that we want to have at most 10 unacknowledged messages in our consumer.
rabbit
  .declareTopology(topology(name))
  .createTransactionalConsumerStream(name, Integer.class)
  .withPrefetch(10)  (1)
  .receive()
  .doOnNext(txNumber -> log.debug("Received: {}", txNumber.get()))
  .delayElements(Duration.ofSeconds(20))  (2)
  .timeout(Duration.ofSeconds(20))  (3)
  .subscribe(txNumber -> {
    txNumber.commit();
          expectedMessage.countDown();
          if (expectedMessage.getCount() < 1) terminated.countDown();
  }, throwable -> {  (4)
                  log.error("Receiver pipeline failed due to {}", throwable.getMessage());
                  terminated.countDown();
          })
);| 1 | Configure our consumer stream to have at most 10 unacknowledged messages. In terms of
our TranactionalConsumerStream, this means at most 10 uncommitted transactions |
| 2 | Simulate our application being slow processing events |
| 3 | And after 20seconds without no events, because we are delaying them, the pipeline is terminated |
| 4 | We handle the error so that we can log it and detect when it happens. But it is important to understand that an error always terminates the pipeline. |
Let’s test our consumer which sends 10 numbers but the receiver’s pipeline takes too long to consume the events and it is abruptly terminates with uncommitted events and these events are returned back to the queue.
> ./run --role=abruptlyTerminatedConsumer
...
2020-02-04 19:30:29.853 c.p.r.g.ReliableReceiveApplication       Emitting: 3
2020-02-04 19:30:29.863 c.p.r.g.ReliableReceiveApplication       Sent: 3
2020-02-04 19:30:34.825 r.r.Receiver                             Cancelling consumer com.pivotal.rabbitmq.ReactiveRabbitBuilder$$Lambda$161/1740189450@51ad1ac6#1 consuming from abruptlyTerminatedConsumer
2020-02-04 19:30:34.838 c.p.r.g.ReliableReceiveApplication       Receiver pipeline failed due to Did not observe any item or terminal signal within 20000ms in 'concatMap' (and no fallback has been configured)
2020-02-04 19:30:34.838 c.p.r.g.ReliableReceiveApplication       Disposing all pipelines
2020-02-04 19:30:34.840 c.p.r.g.ReliableReceiveApplication Disposed all pipelines| You can monitor the number of unacknowledged messages here just before the pipeline is terminated. |
3.8.4. Guarantee that illegal events are always rejected but not necessarily lost
We have to use TransactionalConsumerStream in order to have this guarantee. ConsumerStream will automatically ack the event regardless
whether they may carry an illegal event.
TransactionalConsumerStream will always -and silently- reject all illegal events. This means that
the event will be removed from RabbitMQ and it will never be redelivered again. However, if we have configured our queue with a dead-letter-exchange
and the exchange has at least one queue bound to it, we won’t lose the rejected event. Instead, RabbitMQ will automatically publish (with publisher confirms)
the event onto the dead-letter-exchange and ultimately to the dead-letter-queue.
First of all, we are going to use a slightly different topology which configures a dead-letter-exchange and a queue in addition to the topology we have been using in the previous use cases. It is not absolutely necessary that the queue exists but for our tutorial we have to otherwise we would loose the illegal events otherwise.
private Consumer<TopologyBuilder> topologyWithDeadLetterQueue(String name) {
  return (topologyBuilder) -> topologyBuilder
      .declareExchange(name)
      .and()
      .declareExchange(name + "-dlx")   (1)
      .and()
      .declareQueue(name + "-dlx")      (2)
        .boundTo(name + "-dlx")
      .and()
      .declareQueue(name)
        .withDeadLetterExchange(name + "-dlx")  (3)
        .boundTo(name);
}| 1 | Declare the dead-letter-exchange. The convention is to use the -dlx suffix to
easily recognize dead letter exchanges and queues. |
| 2 | Declare the dead-letter-queue bound to the exchange. |
| 3 | Declare the topology’s queue with the dead-letter-exchange we created beforehand |
And here is our consumer stream.
rabbit
  .declareTopology(topologyWithDeadLetterQueue(name))
  .createTransactionalConsumerStream(name, String.class)  (1)
  .whenReceiveIllegalEvents()
    .alwaysReject()   (2)
  .then()
  .receive()
  .doOnNext(txNumber -> log.debug("Received: {}", txNumber.get()))  (3)
  .doOnError(t -> log.error("Received {}", t.getMessage()))  (4)
  .subscribe(Transaction::commit)

....| 1 | Create a transactional consumer stream with the wrong type. The queue has Integer(s) but we are expecting String(s). |
| 2 | Configure the stream to always reject when it receives illegal events. This is the default behaviour though. |
| 3 | This operator should never receive an event because we are sending Integer(s) |
| 4 | This operator should never receive an error because of illegal events |
Let’s test our consumer which sends 10 Integer`(s) but the receiver’s pipeline expects String(s).
Check out the queue rejectIllegalEvent-dlx while running the command. We should see all integers go
to that queue.
> ./run --role=rejectIllegalEvent
...
2020-02-04 19:30:29.853 c.p.r.g.ReliableReceiveApplication       Emitting: 3
2020-02-04 19:30:29.863 c.p.r.g.ReliableReceiveApplication       Sent: 3
...
2020-02-04 19:30:34.838 c.p.r.g.ReliableReceiveApplication       Disposing all pipelines
2020-02-04 19:30:34.840 c.p.r.g.ReliableReceiveApplication       Disposed all pipelines
3.8.5. Guarantee that we can terminate the stream when an illegal event arrives without loosing them
We have to use TransactionalConsumerStream in order to have this guarantee. ConsumerStream will automatically ack the events regardless
whether they may carry an illegal event.
TransactionalConsumerStream will always reject all illegal events however we can change that behaviour to terminate the stream instead.
Terminating the stream has the effect of closing the consumer and therefore returning to the queue all unacked events, including the
illegal event.
rabbit
        .declareTopology(topology(name))
        .createTransactionalConsumerStream(name, String.class)  (1)
        .whenReceiveIllegalEvents()
          .alwaysTerminate()   (2)
        .then()
        .receive()
        .doOnNext(txNumber -> log.debug("Received: {}", txNumber.get())) (3)
  .doOnError(t -> log.error("Received {}", t.getMessage()))  (4)
.subscribe(Transaction::commit, t-> terminated.countDown())| 1 | Create a transactional consumer stream with the wrong type. The queue has Integer but we are expecting String. |
| 2 | Configure the stream to always terminate when it receives illegal events. |
| 3 | This operator should never receive an event because we are sending Integer(s) |
| 4 | This operator should receive the exception ShutdownPipelineException which terminates the stream |
Let’s test our consumer which sends 10 Integer`(s) but the receiver’s pipeline expects String(s). When it
receives the first number, it terminates.
> ./run --role=terminateWhenIllegalEvent
...
2020-02-06 12:11:13.064 c.p.r.g.ReliableReceiveApplication       Emitting: 1
2020-02-06 12:11:13.093 c.p.r.g.ReliableReceiveApplication       Sent: 1
2020-02-06 12:11:13.110 c.p.r.s.T.c.String                       Propagating error due to conversion from message to event type
2020-02-06 12:11:13.113 r.r.Receiver                             Cancelling consumer com.pivotal.rabbitmq.ReactiveRabbitBuilder$$Lambda$161/503195940@e0d3f20#1 consuming from terminateWhenIllegalEvent
2020-02-06 12:11:13.123 c.p.r.s.T.c.String                       receive() onError
com.pivotal.rabbitmq.stream.ShutdownPipelineException: Shutdown pipeline originated by application
	at com.pivotal.rabbitmq.stream.TransactionalConsumerStream.lambda$alwaysTerminate$1(TransactionalConsumerStream.java:75)
	at com.pivotal.rabbitmq.stream.IllegalTransactionalEventHandler.handle(IllegalTransactionalEventHandler.java:37)
...
3.9. Send consumed events reliably
In this forth tutorial, we are going to learn how to send an output event which resulted from processing an input event taking into account the following guarantees:
-
guarantee that input events are only acked after the application has successfully sent its respective output event
-
guarantee that any input events which has not been successfully sent yet are not lost if the application crashes
Source code available here
3.9.1. Guarantee input events are only acked after successfully sent its respective output event
We learnt in previous tutorials that received events are not committed (i.e. acked) until we call Transaction.commit.
We also learnt that ProducerStream.send returns an stream (i.e. Flux<>) which emits events which have already been
successfully sent (i.e. it has received publisher confirms), not earlier.
| There are two important things to learn here. One is that we can easily receive input events and transform them in any way we like to produce an output event of any type. And two, that the input events are only removed from its queue after its respective output event has been successfully sent. |
In our sample code, we receive Integer(s) as input events and transform them into Long(s).
First of all, let’s build the stream of input events by reading from the numbers topology which is nothing more than a {fanout exchange, queue}
tuple.
Flux<Transaction<Integer>> streamOfReceivedNumbers = rabbit
  .declareTopology(numbers.topology())  (1)
  .createTransactionalConsumerStream(numbers.name, Integer.class) (2)
.receive(); (3)| 1 | Declare the topology as usual. |
| 2 | Create a TransactionalConsumerStream which consumes Integer(s) from the numbers queue |
| 3 | receive() returns the actual stream of Transaction<Integer> |
Next, we are going to multiple each Integer by 2 and convert it to Long. This transformation
produces a new type of stream, `Flux<Transaction<Long>>.
(2)
Flux<Transaction<Long>> streamOfMultipliedNumbers = streamOfReceivedNumbers
.map(txNumber -> txNumber.map(txNumber.get() * 2L)); (1)| 1 | Transform the Integer value which is inside the Transaction<Integer> and multiple it by 2 to produce a Long value.
And use that Long value to map the original Transaction<Integer> into Transaction<Long>. The
new Transaction<Long> is still linked to the original Transaction<Integer>, thus the context of the original
received event is propagated. |
| 2 | See that now we have a new stream of type Flux<Transaction<Long>> |
Once we have the stream of output events, we send them.
(5)
Flux<Transaction<Long>> streamOfSentNumbers = rabbit
                                .declareTopology(multipliedNumbers.topology())  (1)
                                .createTransactionalProducerStream(Long.class)  (2)
                                .route()
                                        .toExchange(multipliedNumbers.name) (3)
                                .then()
                                .send(streamOfMultipliedNumbers); (4)

                        streamOfSentNumbers
.subscribe(Transaction::commit); (6)| 1 | Declare the topology used for multiplied numbers which consists of a {fanout exchange, queue} tuple |
| 2 | Create a TransactionProducerStream and not a ProducerStream because this time we are going to
send an stream of Transaction<Long> not a stream of Long. |
| 3 | We are going to route all numbers to the exchange declared in the topology |
| 4 | We send the stream of multiplied numbers we built earlier |
| 5 | send() returns an stream of successfully sent numbers which we can commit as soon as we wish |
| 6 | And finally, we commit each sent Long number which in turn commits the original input Integer number and
ultimately the message that carried it. |
Let’s put 10 numbers into the input-numbers queue.
> ./producerNow, let’s consume those 10 numbers, multiply them and send the result to multiplied-numbers queue.
> ./multiplerAnd finally, consume the multiplied numbers:
> ./consumer3.10. Consume events reliably even exceptions occur
In the previous tutorial we learnt how to reliably consume events from RabbitMQ without loosing them. In this tutorial, we are going to learn how to handle exceptions that may occur at any stage of the processing pipeline.
| It is important to understand that, unless we do something about it, when an exception occurs it terminates the pipeline. In other words, our consumer stops and most likely our application exits. Any uncommitted event is returned back to RabbitMQ and redelivered to another consumer, if any available. In other words, we do not loose them. |
It is fair that we do not loose any event in case of exceptions however we also want the application to gracefully handle them and continue processing. Preferably, we should be able specify how we want to handle each exception or group of exceptions to either:
-
reject some events. If the queue has a DLX+DLQ, the event is moved to DLQ
-
or requeue others. We have to be very careful with this option because the event will be immediately redelivered. If the root cause that originated the exception persists, we end up with a poisonous message.
-
or even terminate the pipeline in some edge cases.
Source code available here
3.10.1. In case of checked exceptions reject the transaction otherwise terminate
In the previous tutorials, we learnt that we must always terminate the pipeline committing the transaction like shown below:
    Flux<Transaction<?>> stream = ...;
    stream.subscribe(Transaction::commit);
Or if not at the very end of the pipeline but as soon as we consider that we have completed the transaction.
  Flux<Transaction<?>> stream = ...;
  stream.map(...)
        .doOnNext(Transaction::commit)
        ....
        .subscribe();
However, our pipelines did gracefully handle exceptions which meant our pipeline terminated if an exception occurred.
To gracefully handle exceptions, or commit the event, even discarded ones (i.e. those filtered out by the
Flux.filter operator) we use this method instead.
  Flux<Transaction<Integer>> stream = ...;
  stream.transform(ReactiveRabbit
          .<Integer>rejectWhen(RuntimeException.class)
          .terminateWhen(Throwable.class)
          .elseCommit()
        )
        .subscribe();
In the sample code above, we are essentially saying that in case of RuntimeException we want to reject
the event (and move them to a DLQ), and in case of any other exception we want to terminate (default behaviour)
otherwise we want to commit the event. Also, if the event is discarded by a Flux.filter operator, it is also
committed.
See a snipped of code corresponding to the demo application we use for this tutorial.
// And consume numbers from the topology
pipelines.add(rabbit
  .declareTopology(topologyWithDeadLetterQueue(name))
  .createTransactionalConsumerStream(name, Integer.class)
  .receive()
  .doOnNext(txNumber -> log.debug("Received: {}", txNumber.get()))
  .filter(txNumber -> txNumber.get() % 2 == 0)  (1)
  .doOnNext(txNum -> {
          if (txNum.get() == 4) throw new RuntimeException();  (2)
          else if (txNum.get() == 10) throw Exceptions.propagate(new Throwable()); (3)
  })
  .transform(ReactiveRabbit
          .<Integer>rejectWhen(RuntimeException.class) (4)
          .terminateWhen(Throwable.class)  (5)
          .elseCommit()) (6)
  .doOnNext(txNumber -> log.debug("Processed: {}", txNumber.get())) (7)
  .subscribe(txNumber -> {
          expectedMessage.countDown();
  }, throwable -> {
    log.error("Pipeline terminated", Exceptions.unwrap(throwable)); (8)
          expectedError.countDown();
  })
);| 1 | keep only odd numbers; filter out even numbers |
| 2 | simulate RuntimeException being thrown while processing an event |
| 3 | simulate Throwable being thrown while processing an event |
| 4 | in case of RuntimeException, reject the event |
| 5 | in case of any other exception, terminate |
| 6 | otherwise commit, including filtered out events |
| 7 | operator invoked by successfully committed (excluding filtered out events) |
| 8 | invoked when the pipeline terminates due to an exception. In our case, an exception thrown at <3>.
We should always use Exceptions.unwrap() method to determine the original exception as all
exceptions except RuntimeException are wrapped around ReactiveException. |
The demo application sends 10 numbers and consumes those 10 numbers all in our executable.
> ./run --role=skipRejectAndTerminateIt should produce an output like this:
...
2020-02-25 14:49:05.644 c.p.r.g.ReliableReceiveApplication       Emitting: 1
2020-02-25 14:49:05.673 c.p.r.g.ReliableReceiveApplication       Sent: 1
2020-02-25 14:49:05.691 c.p.r.g.ReliableReceiveApplication       Received: 1
2020-02-25 14:49:10.670 c.p.r.g.ReliableReceiveApplication       Emitting: 2
2020-02-25 14:49:10.677 c.p.r.g.ReliableReceiveApplication       Received: 2
2020-02-25 14:49:10.678 c.p.r.g.ReliableReceiveApplication       Processed: 2
2020-02-25 14:49:10.679 c.p.r.g.ReliableReceiveApplication       Sent: 2
2020-02-25 14:49:15.674 c.p.r.g.ReliableReceiveApplication       Emitting: 3
2020-02-25 14:49:15.684 c.p.r.g.ReliableReceiveApplication       Received: 3
2020-02-25 14:49:15.685 c.p.r.g.ReliableReceiveApplication       Sent: 3
2020-02-25 14:49:20.678 c.p.r.g.ReliableReceiveApplication       Emitting: 4
2020-02-25 14:49:20.688 c.p.r.g.ReliableReceiveApplication       Received: 4
2020-02-25 14:49:20.690 c.p.r.g.ReliableReceiveApplication       Sent: 4
2020-02-25 14:49:25.683 c.p.r.g.ReliableReceiveApplication       Emitting: 5
2020-02-25 14:49:25.690 c.p.r.g.ReliableReceiveApplication       Received: 5
2020-02-25 14:49:25.693 c.p.r.g.ReliableReceiveApplication       Sent: 5
2020-02-25 14:49:30.686 c.p.r.g.ReliableReceiveApplication       Emitting: 6
2020-02-25 14:49:30.694 c.p.r.g.ReliableReceiveApplication       Received: 6
2020-02-25 14:49:30.695 c.p.r.g.ReliableReceiveApplication       Processed: 6
2020-02-25 14:49:30.697 c.p.r.g.ReliableReceiveApplication       Sent: 6
2020-02-25 14:49:35.691 c.p.r.g.ReliableReceiveApplication       Emitting: 7
2020-02-25 14:49:35.702 c.p.r.g.ReliableReceiveApplication       Received: 7
2020-02-25 14:49:35.705 c.p.r.g.ReliableReceiveApplication       Sent: 7
2020-02-25 14:49:40.697 c.p.r.g.ReliableReceiveApplication       Emitting: 8
2020-02-25 14:49:40.709 c.p.r.g.ReliableReceiveApplication       Received: 8
2020-02-25 14:49:40.709 c.p.r.g.ReliableReceiveApplication       Processed: 8
2020-02-25 14:49:40.709 c.p.r.g.ReliableReceiveApplication       Received the expected number of messages. Checkout skipRejectAndTerminate-dlx queue
2020-02-25 14:49:40.712 c.p.r.g.ReliableReceiveApplication       Sent: 8
2020-02-25 14:49:45.699 c.p.r.g.ReliableReceiveApplication       Emitting: 9
2020-02-25 14:49:45.705 c.p.r.g.ReliableReceiveApplication       Received: 9
2020-02-25 14:49:45.709 c.p.r.g.ReliableReceiveApplication       Sent: 9
2020-02-25 14:49:50.704 c.p.r.g.ReliableReceiveApplication       Emitting: 10
2020-02-25 14:49:50.712 c.p.r.g.ReliableReceiveApplication       Received: 10
2020-02-25 14:49:50.714 r.r.Receiver                             Cancelling consumer com.pivotal.rabbitmq.ReactiveRabbitBuilder$$Lambda$176/1663166483@1eed11ca#1 consuming from skipRejectAndTerminate
2020-02-25 14:49:50.715 c.p.r.g.ReliableReceiveApplication       Sent: 10
2020-02-25 14:49:50.726 c.p.r.g.ReliableReceiveApplication       Pipeline terminated
...
See that we only processed events 2, 6 and 8. The other missing events were either
filtered out, or rejected.
See that we still have 1 event in the main queue which
corresponds to the event 10
See that we have 1 event in the dlx queue which
corresponds to the event 2
See that the pipeline terminated with an exception. ---
3.11. Function-based streaming application
This is the first time we touch upon this concept of Function-based streaming applications. It is a programming model suitable for simple streaming applications whose business logic can be encapsulated into a single function. This is nowadays called Function as a Service.
There are 3 types of functions:
-
a supplier is a function that produces an output and takes no input. A supplier FaaS is an application that sends events to RabbitMQ. It requires a supplier function which provides the Flux of events to send to RabbitMQ.
-
a processor is a function that takes an input and produces an output. A processor FaaS is an application that receives events from an stream (bound to a queue), calls a processor function to convert the input event onto an output event. And eventually, the output event is sent RabbitMQ via another stream.
-
and a consumer is a function that takes an input and produces no output. A consumer FaaS is an application that receives events and calls a consumer function to process them.
| So far, Reactor RabbitMQ Streams does not support yet the ability to define streams via configuration. We still have to create them by code. However, in the future, we would be able to define the stream by configuration along with the name of the corresponding function so that we do not have to code anything except the implementation of our functions. |
In the next section, we will introduce an application of each type, but for now, we wanted to provide a sample code of a supplier application to grasp the idea.
@Bean("numbers")
public Supplier<Flux<Integer>> eventSupplier() {  (1)
  return () -> {
    return Flux.range(1, Integer.MAX_VALUE).delayElements(this.delay).doOnNext((e) -> {
       log.info("Supplying {}", e);
    });
  };
}

@Bean
public Disposable stream(Consumer<TopologyBuilder> topology,
    @Value("${output:numbers}") String exchange,
    @Qualifier("numbers") Supplier<Flux<Integer>> supplier) { (2)

  return this.rabbit
    .declareTopology(topology)
    .createProducerStream(Integer.class)
    .route()
      .toExchange(exchange)
    .then()
    .send(supplier.get())
    .subscribe();
}| 1 | Implement our Supplier function. |
| 2 | Inject our Supplier function. If our application is a pure FaaS, there should
only be one single Supplier function therefore we do not need to use Qualifier.
However, if our application may have multiple @Bean of the same type then we have to
be more precise as to which supplier function we want to use. |
3.11.1. Demonstration
Under getting-started/deploy-pivotal-platform folder we have the following 3 applications:
Before deploying the application make sure you have a RabbitMQ Service instance called rabbit. For instance, here
is a sample command to do it:
cf create-service p.rabbitmq single-node rabbitThen run the following command to build and deploy all the applications:
cd deploy-pivotal-platform
./deploy| It fails if the service does not exist |
To check what numbers the supplier is producing:
cf logs cf-supplierTo check what numbers the consumer is consuming:
cf logs cf-consumer3.12. Routing Events Dynamically
In a previous tutorial about managing topologies, we not only learnt how to declare complex topologies but also how to dynamically route events by calculating the routing key for each event.
In this tutorial, we are going to focus on this topic with these two samples:
And we are also going to introduce the concept of Stream Sources. So far, all the examples we have seen send an auto-generating Flux of events. That works fine for demonstration purposes. But what happens, for instance, when we want to send an event as a result of handling a REST request? Here are two sample applications that needs to send events on-demand.
Source code for these samples is available here.
3.12.1. Dynamically route events based on event’s details
Given an stream of Shipment events, we want to route them to 3 queues based on their volume/value.
The routing rules are: Shipments with a value
-
Up to 10K, route to
10Kqueue -
Up to 50K, route to
50Kqueue -
Else route to
largequeue
Below we have the relevant snippets of code to understand how routing is done.
@Bean
public Disposable router(RoutingTable routingTable, Source<Shipment> shipments) {

  return rabbit
    .declareTopology(routingTable.topology())
    .createTransactionalProducerStream(Shipment.class)
    .route()
        .toExchange("volume")         (1)
        // .toExchange("")                 (4)
        // .useExchangeSelector(routingTable.exchangeSelector())  (5)
        .withRoutingKey(routingTable.routingKeySelector()) (2)
    .then()
    .send(shipments.source())
    .subscribe();

}

Function<Shipment, String> routingKeySelector() {
  return shipment -> { (3)
    if (shipment.getValue() <= 100000.0) return "10k";
    if (shipment.getValue() <= 500000.0) return "50k";
    else return "large";
  };
}| 1 | ALL shipments are sent to an exchange called volume regardless of the shipment |
| 2 | Configures a routing key selector so that we can choose the routing key based on the event |
| 3 | Function that returns a routing key given a shipment event. It determines the routing key based on the shipment’s value |
| 4 | If you prefer to send directly to queues using the default exchange |
| 5 | If you prefer to determine the exchange based on the event’s details |
| In our sample application above, we declare the topology. However, we can imagine that in some environment the topology may already exists. |
If you want to send events directly to queues (via the default exchange) rather
than via an exchange, you have to specify the default exchange (i.e. toExchange(""))
and the routing key selector should return a queue name rather than a binding queue.
In the sample above, the binding key matches the queue name.
|
| We need to ensure that our events end up on a queue. If your routing logic may route events to an unknown queue, you should declare the exchange with an alternate exchange with a bound queue. Also, make sure you do not route to an unknown exchange as Reactor RabbitMQ Streams will fail to send it. |
Run the application as follows:
cd getting-started/routing-events
./run
Open management ui and check out the depth of the 10k, 50k and large queues.
3.12.2. Dynamically route events based on event’s details using a single router function
So far we have learnt that we can specify the routing key, or the exchange, the
BCC/CC headers; or even event’s message attributes such as message_id,
timestamp, or header(s), by providing separate function/lambdas for each item.
In some circumstances, this makes sense because maybe the logic that determines routing has nothing to do with the logic that determines the timestamp for instance.
But there are other circumstances where the business logic wants to consolidate the routing and some event’s message attributes within a single function/lambda.
For instance, in our Shipment sample above, if wanted to dynamically determine the routing key, the exchange and some headers within a single function we could have done like this:
Source code for these samples is available here.
public class RouterApplication {

....

@Bean
public Disposable router(RoutingTable routingTable, Source<Shipment> shipments) {

  return rabbit
    .declareTopology(routingTable.topology())
    .createTransactionalProducerStream(Shipment.class)
    .routeWith((builder, shipment) -> {  (1)

      String exchange;
      String routingKey;
      // run complex business logic that calculates exchange and routingKey

      builder  (2)
        .toExchange(exchange)
        .withRoutingKey(routingKey)
        .messageId(shipment.getId().toString())
        .header("category_1", shipment.getCategory1())
        .header("category_2", shipment.getCategory2())
      }
    )
    .withAttributes()
      .header("transport", this::determineTransport)  (3)
    .then()
    .send(shipments.source())
    .transform(ReactiveRabbit
      .<Shipment>rejectWhen(RuntimeException.class)
      .terminateWhen(Throwable.class)
      .elseCommit()
    )
    .subscribe();

}| 1 | routeWith expects a BiConsumer which takes two arguments, a EventMessageBuilder and
the event itself |
| 2 | EventMessageBuilder allows us to set attributes of the message that will carry the event such as
routing attributes as well as headers. |
| 3 | We can add additional event’s attributes using separate function/lambdas for
each attribute. If there were any conflicts between the two, the routeWith wins over withAttributes. |
route and routeWith are incompatible. We cannot use both.
|
3.12.3. A REST endpoint routing events to RabbitMQ
This is the first sample application, in this guide, where events are dynamically
generated by the application upon some business invocation. More specifically,
our sample application is a REST application which exposes an POST endpoint which expects
a ShipmentRequest. As a result of processing such the request, it sends a Shipment
event. And when it is successfully sent, it sends back a ShipmentConfirmation as the HTTP response.
Reactor RabbitMQ Streams provides a class called OnDemandSource<T>. This class
serves two purposes. First, it is a Source<T> which means it has a method that supplies
a Flux<Transaction<T>> which we can use to pass it onto a TransactionalProducerStream.
And it is also a Sender<T> because it allows an application to send individual events and get
back a Mono<T> that emits the event when it has been successfully sent or an error when it has
failed to send it.
We are using the same application used in the two previous sections. Notice the following two methods in the main application class below.
Source code is available here.
public class RouterApplication {
  ...

  @Bean
  public Disposable router(RoutingTable routingTable, Source<Shipment> shipments ) { (2)
     ...
      .then()
      .send(shipments.source()) (3)
      ...
  }

  @Bean
  OnDemandSource<Shipment> shipments() { (1)
    return new OnDemandSource<>("shipments");
  }
  @Bean
  Sender shipmentSender(OnDemandSource<Shipment> shipments) { (4)
    return shipments;
  }
}| 1 | We create an instance of OnDemandSource<Shipment> |
| 2 | OnDemandSource is actually a Source which we are going to inject it into the router method |
| 3 | We send the stream provided by Source<Shipment> |
| 4 | We build a Sender bean obtained from the actual OnDemandSource. The ShipmentController
will use it to send shipments. |
| At the moment (v0.0.5), if an application pushes more events than what can be sent to RabbitMQ, it will reject them. This is the default and unique behaviour. Another option would have been to buffer them with a risk of running out of memory if it gets out of hand. Under the covers, Reactor RabbitMQ Streams uses UnicastProcessor with the OverflowStrategy.ERROR. If you want to, you can create your own UnicastProcessor with a OverflowStrategy.BUFFER. |
And below we have the Rest controller.
@RestController
@RequestMapping("/shipment")
public class ShipmentController {
  public static Logger log = LoggerFactory.getLogger(ShipmentController.class.getName());

  @Autowired
  Sender<Shipment> shipments; (1)

  @PostMapping
  public Mono<ShipmentConfirmation> post(@RequestBody Mono<ShipmentRequest> request ){ (2)
    return request
      .map(r -> {
         String id = UUID.randomUUID().toString();
         log.info("Processing shipment request {} -> {}", r, id);
         return newShipment(id, r); (3)
      })
      .doOnNext(s -> { (4)
         if (s.getId().hashCode() % 5 == 0) throw new RuntimeException("Some business rule failed");
      })
      .flatMap(r-> shipments.send(r)) (5)
      .map(this::toShipmentConfirmation) (6)
      ;
}| 1 | Inject the Sender so that we can send shipments |
| 2 | Receive request payload thru a Mono so that we can start our pipeline right from the request |
| 3 | Handle the request: Take a ShipmentRequest and convert it into our Avro Shipment object |
| 4 | Simulate further processing which may fail the request |
| 5 | Send the shipment which returns a Mono |
| 6 | Convert the successfully sent Shipment into a ShipmentConfirmation object that we send as
the http response. |
To test it, first launch the application:
cd routing/from-rest-to-stream
./run|
If you capture the following error in the logs make sure you have deployed the schema
registry server by running the script
|
Then, launch the following command to send a valid request:
curl -v -H "Content-Type: application/json" --request POST --data '{ "id":"122", "category1":"cat1", "category2": "cat", "transport": "train", "value": 1500.0 }' localhost:8080/shipment/Launch the following command to send an invalid request:
curl -v -H "Content-Type: application/json" --request POST --data '{ "id":"122", "category1":"cat1", "category2": "cat", "transport": "train" }' localhost:8080/shipment/3.12.4. A Websocket endpoint routing events to RabbitMQ
This sample application shows how to use Reactor RabbitMQ Streams in a Websocket application. A Websocket endpoint receives requests, processes them and sends back a response in a stream-like fashion.
| Not ready yet. |
3.12.5. Stream a local/remote file to RabbitMQ
This sample application shows how to stream a file directly to RabbitMQ. At the moment,
the raw mechanism is available under the FluxSources class. However, it is very rudimentary
and it only supports text files and streams lines contained in the text file.
| Not ready yet. |
3.13. Resilient endpoints
In previous tutorial, we are learnt how to stream events to RabbitMQ and consume from RabbitMQ without loosing them.
In this tutorial, we are going to learn how to make our streaming application deal with connection failures and/or even with situations when there are no RabbitMQ servers running.
The only thing we really need to do is configure the endpoint with the followings:
-
the number of connection retries we want
-
all the RabbitMQ servers' address in the cluster
Source code available here
3.13.1. Endpoint connection configuration
By default, endpoints share the following connection configuration
rabbit:
  endpoints:
    my-endpoint:
      host: localhost
      port: 16572 (2)
      managementPort: 15672 (4)
      username: guest
      password: guest
      virtualHost: /
      addresses: localhost:5672 (1)
managementAddresses: localhost:15672 (3)| 1 | comma-separated list of hostname:port AMQP addresses |
| 2 | if addresses do not specify port, it defaults to this port |
| 3 | comma-separated list of hostname:port addresses to the management api |
| 4 | if managementAddresses do not specify port, it defaults to this port |
Detailed AMQP/HTTP address configuration
If we have more than one URL for AMQP; which is the case when have a a cluster
without a load balancer or proxy in front of it. We configure the address of each
server in the addresses attribute.
| Index | Given this configuration | Resolved AMQP address | Resolved HTTP address |
|---|---|---|---|
1 |
addresses: host1,host2 |
amqp://host, amqp://host2 |
http://host:15671, http://host2:15671 |
2 |
addresses: amqp://host1,amqp://host2 |
amqp://host, amqp://host2 |
http://host:15671, http://host2:15671 |
3 |
addresses: amqp://host1:8881,amqp://host2:8882 |
amqp://host:8881, amqp://host2:8882 |
http://host:15671, http://host2:15671 |
4 |
addresses: host1:8881,host2:8882 |
amqp://host:8881, amqp://host2:8882 |
https://host:15671, https://host2:15671 |
5 |
addresses: host1:8881, host2:8882 managementAddresses: host1:7771, host2:7772 |
amqp://host:8881, amqp://host2:8882 |
http://host:7771, http//host2:7772 |
6 |
managementPort: 443 addresses: host1:8888,host2:8888 |
amqp://host:8888, amqp://host2:8888 |
http://host, http://host2 |
If we have just one URL for AMQP; then we can use the host attribute or
the addresses attribute.
| Index | Given this configuration | Resolved AMQP address | Resolved HTTP address |
|---|---|---|---|
1 |
host: host1 |
amqp://host1 |
http://host1:15671 |
2 |
port: 5671 host: host1 |
amqp://host1 |
http://host1:15671 |
3 |
port: 8888 host: host1 |
amqp://host:8888 |
http://host1:15671 |
4 |
port: 8888 managementPort: 80 host: host1 |
amqp://host:8888 |
http://host1 |
For (m)TLS configuration check out Secure Connections using TLS guide.
Detailed credentials and virtualhost configuration
| Index | Configuration | Resolved credentials |
|---|---|---|
1 |
addresses: amqp://host1 |
username: guest password: guest virtualhost: / |
2 |
virtualhost: three addresses: amqp://host1 |
username: guest password: guest virtualhost: three |
3 |
username: bob password: pwd virtualhost: three addresses: amqp://host1 |
username: bob password: pwd virtualhost: three |
4 |
addresses: amqp://bob:pwd@host1/three |
username: bob password: pwd virtualhost: three |
3.13.2. Endpoint connection recovery configuration
By default, endpoints share the following connection recovery configuration which makes them sufficiently resilient.
rabbit:
  endpoints:
    my-endpoint:
      connection:
        retryMax: 10 (1)
        timeout: 60s  (2)
        randomBackoff:
          firstBackoff: 1s  (3)
maxBackoff: 10s (4)| 1 | Maximum number of attempts. int ConnectionRetryPolicyProperties.getRetryMax() |
| 2 | Total attempt time before terminating the application. Duration ConnectionRetryPolicyProperties.getTimeout() |
| 3 | Delay before first re-attempt. Duration RandomBackoffProperties.getFirstBackoff() |
| 4 | Maximum delay on next attempts. Duration RandomBackoffProperties.getMaxBackoff() |
3.13.3. Test resiliency
We are going to test that both, consumer and producer streams, are able to reconnect when they
see the connection dropped. Furthermore, we are also going to test that they
do not lose any messages either. The producer sends 1000 integers, one every 250msec.
When the consumer receives all 1000 integers, it prints out the message Received all 1000 integers.
The sample application creates a fanout exchange (resilient-producer)
and a mirrored queue (resilient-consumer) bound to the exchange.
| The consumer drops duplicate integers so that they do not count as received message. |
First we launch the sample application in one terminal:
> ./run --role=resilient-producer-consumer
...
2020-02-10 16:24:17.372 c.p.r.g.ResilientEndpointApplication     Sent: 39 (1)
2020-02-10 16:24:17.474 c.p.r.g.ResilientEndpointApplication Received 39 integers in last 5sec| 1 | Wait until we see logging statements like these ones |
Check in the management ui on which node the producer stream is connected to and stop it.
Reactor RabbitMQ Streams name the connection as <application-name>:<endpoint-name>:<stream-name>.
If the stream has no name, it uses sender for producer streams and receiver for consumer streams.
|
> docker-compose -f ../../cookbook/bin/docker-compose.yml stop rmq1 (1)| 1 | This stops rmq1 node |
We should see the producer stream pauses and resumes. Check in the management ui that the producer has connected to another node.
Now check on which node consumer streams is connected to and stop it.
> docker-compose -f ../../cookbook/bin/docker-compose.yml stop rmq1 (1)| 1 | This stops rmq1 node |
We should see the consumer stream pauses and resumes. Check in the management ui that the consumer has connected to another node.
Wait until we see these messages:
2020-02-10 16:24:17.372 c.p.r.g.ResilientEndpointApplication     Sent: 999
2020-02-10 16:24:17.474 c.p.r.g.ResilientEndpointApplication     Received all 1000 integers
3.14. Secure connections using TLS
In this tutorial, we are going to learn how to securely connect our streaming applications with RabbitMQ.
RabbitMQ server should be configured with TLS or with mutual TLS authentication, a.k.a. mTLS.
| Reactor RabbitMQ Streams uses AMQP for messaging and HTTP for policy management. In production we want to secure both protocols, i.e. use AMQPs and HTTPs. The scripts used by this guide configures RabbitMQ with the standard ports: 5672 for AMQP, 5671 for AMPQs, 15672 for HTTP and 15671 for HTTPs. |
3.14.1. Configure application and server with TLS
It is all about configuration. We do not need to change our code to secure it with TLS. The sample application is available here.
Configure RabbitMQ with TLS
Let’s launch a RabbitMQ server with TLS enabled.
RABBITMQ_CONF=rabbitmq-tls.conf bin/deploy-rabbit| Do not use bin/deploy-rabbit-cluster to test TLS. It does not support TLS yet. |
It launches RabbitMQ with this configuration file and it also generates the following artifacts under bin/trusted/basic/result folder:
-
ca_certificate.pema self-signed CA certificate -
server_key.pemthe server’s private key -
server_certificate.pemthe server’s certificate signed by the CA certificate above -
truststorea trust store with the servers' CA certificate. The application will use it to validate the server’s certificate when establishing a TLS connection. This trust store is protected with a password (bunnies).
Configure application with TLS
Below we can see the application’s configuration which has one Spring profile called tls
which is also enabled by default.
spring.profiles.active: tls (1)

---
spring.profiles: tls  (2)
rabbit:
  endpoints:
    standalone:
      ssl:
        preferredSecure: true (3)
        trustStore: ../bin/trusted/basic/result/truststore (4)
trustStorePassword: bunnies (5)| 1 | Enable tls spring profile |
| 2 | Define tls spring profile |
| 3 | By default, secure AMQP and HTTP connections over TLS |
| 4 | Configure trust store location which was created by bin/deploy-rabbit script |
| 5 | Configure trust store password |
To launch the application, run the following command:
> ./run
...
Establishing connection secure-endpoint:standalone:receiver ...
Connection amqps secure-endpoint:standalone:receiver established with localhost/127.0.0.1:5671 on virtualhost: /
3.14.2. Configure application and server with mutual TLS
Once again, it is all about configuration. For mTLS, our application needs:
-
A PKCS12 file which contains the application’s private key and certificate
-
The certificate must be signed by the server’s CA certificate (or at least one one of the trusted CA installed in the RabbitMQ Server).
| To know more about how RabbitMQ verifies application’s certificate, check out www.rabbitmq.com/ssl.html#peer-verification |
-
A keystore with the PKCS12 file above and the password that protects it
Configure RabbitMQ with mutual TLS
Now, let’s launch a RabbitMQ server with mTLS enabled. Run the following command:
RABBITMQ_CONF=rabbitmq-mtls.conf bin/deploy-rabbitIt launches RabbitMQ with this configuration file and it also generates the following artifact under in addition to the artifacts generated earlier for TLS:
-
client_key.p12a PKCS12 file with the application’s private key and certificate signed by the server’s CA certificate. This is the application’s keystore required to successfully connect to RabbitMQ over mTLS.
Configure application with mTLS
To test mTLS we have two Spring profiles. One called mtls-with-trusted-client which
configures a keystore with a client’s certificate issued and trusted by RabbitMQ Server.
And another called mtls-with-untrusted-client which configures a keystore with a
client’s certificate issued by itself and therefore not trusted by RabbitMQ server. With
this profile, our application will not be able to connect.
spring.profiles: mtls-with-trusted-client
spring.profiles.include: tls
rabbit:
  endpoints:
    standalone:
      ssl:
        keyStorePassword: bunnies
        keyStore: ../getting-started/bin/trusted/basic/result/client_key.p12 (1)

---
spring.profiles: mtls-with-untrusted-client
spring.profiles.include: tls
rabbit:
  endpoints:
    standalone:
      ssl:
        keyStorePassword: bunnies
keyStore: ../getting-started/bin/selfsigned/basic/result/client_key.p12 (2)| 1 | Trusted client’s certificate by RabbitMQ server |
| 2 | Self signed, and untrusted, client’s certificate by RabbitMQ server |
Launch the application that successfully connects to RabbitMQ.
./run --spring.profiles.active=mtls-with-trusted-clientTo verify the application cannot connect when it does not provide a trusted client’s certificate run instead:
./run --spring.profiles.active=mtls-with-untrusted-client3.14.3. TLS configuration explained
If we have more than one URL for AMQP(s); which is the case when have a a cluster
without a load balancer or proxy in front of it. We configure the address of each
server in the addresses attribute.
| Index | Given this configuration | Resolved AMQP address | Resolved HTTP address |
|---|---|---|---|
1 |
preferredSecure: true addresses: host1, host2 |
amqps://host, amqps://host2 |
https://host:15671, https://host2:15671 |
2 |
addresses: amqps://host1, amqps://host2 |
amqps://host, amqps://host2 |
https://host:15671, https://host2:15671 |
3 |
addresses: amqps://host1:8881, amqps://host2:8882 |
amqps://host:8881, amqps://host2:8882 |
https://host:15671, https://host2:15671 |
4 |
preferredSecure: true addresses: host1:8888, host2:8888 |
amqps://host:8888, amqps://host2:8888 |
https://host:15671, https://host2:15671 |
5 |
preferredSecure: true managementPort: 443 addresses: host1:8888, host2:8888 |
amqps://host:8888, amqps://host2:8888 |
https://host, https://host2 |
6 |
preferredSecure: true preferredManagementSecure: false addresses: host1:8888, host2:8888 |
amqps://host:8888, amqps://host2:8888 |
https://host:15672, https://host2:15672 |
| Configuration #3 is an example where we choose a distinct non-standard port for each server. Ideally, if all servers share the same custom port, we should use configuration #2 for less verbosity. Or configuration #1 if using standard port. |
| Configuration #5 is an example where we choose to mount HTTPs port on RabbitMQ over 443 rather than 15671. |
| Configuration #6 is not recommended for production as it is uses HTTP rather than HTTPs. It is here only to demonstrate that we can configure AMQP and HTTP protocols independently. |
If we have just one URL for AMQP(s); then we can use the host attribute or
the addresses attribute.
| Index | Given this configuration | Resolved AMQP address | Resolved HTTP address |
|---|---|---|---|
1 |
preferredSecure: true host: host1 |
amqps://host1 |
https://host1:15671 |
2 |
port: 5671 host: host1 |
amqps://host1 |
https://host1:15671 |
3 |
preferredSecure: true port: 8888 host: host1 |
amqps://host:8888 |
https://host1:15671 |
4 |
preferredSecure: true port: 8888 host: host1 |
amqps://host:8888 |
https://host1:15671 |
5 |
preferredSecure: true port: 8888 managementPort: 443 host: host1 |
amqps://host:8888 |
https://host1 |
3.15. Avro Schema evolution
In this tutorial, we are going to learn how we can make consumers and producers evolve their Avro schemas at different pace without breaking.
Reactor RabbitMQ Streams allows us to configure the serialization/deserialization
protocol by configuring the stream producer/consumer (withCodec(myCodec)). By
default, it has only one implementation which is Avro which is automatically
configured for us.
|
3.15.1. Brief introduction to Backward and Forward schema compatibility
Schemas can evolve with backward and/or forward compatibility or without any compatibility at all.
The evolution is considered from the point of view of a Consumer application.
Backward compatibility
BACKWARD compatibility means that consumers using the new schema (V2) can read data produced with the last schema (V1).
How to make BACKWARD compatible schema changes:
-
Dropping a mandatory field
-
Adding a default (or optional) field
Following are breaking changes:
-
Adding a mandatory field
Forward compatibility
FORWARD compatibility means that data produced with a new schema (V2) can be read by consumers using the last schema (V1), even though they may not be able to use the full capabilities of the new schema (V2).
How to make FORWARD compatible schema changes:
-
Adding a mandatory field
-
Dropping a default (or optional) field
Following are breaking changes:
-
Dropping a mandatory field
Full compatibility
FULL compatibility means schemas (V1 and V2) are both backward and forward compatible. Schemas evolve in a fully compatible way: old data (V1) can be read with the new schema (V2), and new data (V2) can also be read with the last schema (V1). Adding or removing default (or optional) fields is fully compatible.
How to make FULL compatible schema changes:
-
Adding a default (or optional) field
-
Dropping a default (or optional) field
Following are breaking changes:
-
Adding a mandatory field
-
Dropping a mandatory field
3.15.2. How to enable schema evolution in Reactor RabbitMQ Streams
The minimum prerequisites are:
-
We need to have a Spring Cloud Schema Registry server running. This is so that producer applications register the schemas before sending events. And consumer applications fetch the schema referenced in the event (
contentTypemessage property has the schema mimeType) so that they can decode the event. -
We also need to configure our applications with the url of the registry server
rabbit:
  schema:
    registryURL: http://localhost:8990
All the sample code shown in the next sections can be found in this class.
3.15.3. Understanding how we are going to demonstrate various schema evolution scenarios we may encounter
We are going to demonstrate how to evolve from vN to vN+1 and to do that we are going to use Event_v1.avsc
always as vN. And for vN+1 we are going to choose one of the schemas that goes from Event_v2_ to Event_v7_.
Depending on the changes applied on any of the vN+1 files, we may have a forward or backward compatibility, or both, or incompatible schema scenarios.
vs Event_v1.avsc |
Forward compatible | Backward compatible | Full compatible |
|---|---|---|---|
Yes |
No |
No |
|
Yes |
Yes |
Yes |
|
Yes |
Yes |
Yes |
|
Yes |
No |
No |
|
Yes |
Yes |
Yes |
|
No |
No |
No |
|
No |
Yes |
No |
In real life, no one have all these files in their projects but just one, Event.avsc. However, in
order to be able to simulate producer and consumers using vN or vN+1, we need to be able to have all
the versions.
| It is worth clarifying that those version numbers do not correspond to the actual schema version assigned by the schema registry when we register them. These version numbers are just a convenient way for us to name or distinguish different versions of the same schema. |
Topology for schema evolution samples
We will use a common topology across producers and consumers. The topology is designed to ensure that illegal events are not lost. In case case events with incompatible consumer schema will be rejected. The topology will route such events to events-dlq.
Source code available here.
@Bean
public Consumer<TopologyBuilder> eventTopology() {
  return b -> b
    .declareExchange("events")
    .and()
    .declareQueue("events")
      .boundTo("events")
      .withDeadLetterExchange("events-dlx") (1)
    .and()
    .declareExchange("events-dlx")
    .and()
    .declareQueue("events-dlq")
      .boundTo("events-dlx");
}| 1 | Define events queue with dead-letter-exchange |
To produce Avro specific records
If we are producing Avro specific records, i.e. Java classes generated from the Avro schema, we do not need to do anything special to enable schema evolution.
Our producer below sends schemas.event.Event object which were generated from the schema
Event_v1.avsc. Just before sending the first event, it registers the schema with the
schema registry which returns a version number. Once we have the version number, all events are sent
with a contentType which identifies the schema. e.g. application/vnd.Event.v1+avro
if the version was 1.
@Bean
@ConditionalOnProperty(name = "role", havingValue = "producer-specific-event-v1", matchIfMissing = false)
public CommandLineRunner producerSpecificEventV1(Consumer<TopologyBuilder> eventTopology) {
  return (args) -> {
      Flux<Event> events = Flux.range(1, 10).map(n -> Event (1)
              .newBuilder()
              .setId(String.valueOf(n))
              .setTimestamp(System.currentTimeMillis())
              .build());

      rabbit.declareTopology(eventTopology)
              .createProducerStream(Event.class)  (2)
              .route().toExchange("events")
              .then()
              .send(events)
              .doOnNext(e -> log.info("Sent {}", toString(e)))
              .blockLast();
  };

}| 1 | Build Avro specific records using the strongly typed builder class for our specific record |
| 2 | Create a producer stream for that specific record type |
To consume Avro specific records
If we are consuming Avro specific records, i.e. Java classes generated from the Avro schema, we do not need to do anything differently either.
Our consumer below expects schemas.event.v3.Event object which were generated from the schema
Event_v3_AddingOptionalField.avsc. When it receives an event, it fetches the schema identified in
the contentType message property. And then it uses both schemas to decode the event, i.e. the event’s schema a.k.a.
writer schema and the stream’s schema, a.k.a. reader schema. For instance, we could have
sent an event with schema Event_v1.avsc but our consumer below is using Event_v3_AddingOptionalField.avsc.
If both schemas are compatible, it decodes the event contained in the message payload. Else it throws an exception. We have configured our stream consumer to always reject illegal events, i.e. those we cannot decode. We have also configured our queue with a dead-letter-exchange/queue so they are not lost.
@Bean
@ConditionalOnProperty(name = "role", havingValue = "consumer-specific-event-v3", matchIfMissing = false)
public CommandLineRunner consumerSpecificEventV3(Consumer<TopologyBuilder> eventTopology) {

  return (args) -> {
      rabbit.declareTopology(eventTopology)
              .createTransactionalConsumerStream(queue, schemas.event.v3.Event.class)  (1)
              .whenReceiveIllegalEvents()
                  .alwaysReject()
              .then()
              .receive()
              .transform(ReactiveRabbit.commitElseTerminate())
              .subscribe(e -> log.info("Received {}", toString(e)));
  };

}| 1 | Create an stream that consumes the specific java class |
To produce Avro generic records
If we are producing Avro generic records, Reactor RabbitMQ Streams help us build those records. We can configure it to automatically import our local schemas so that when we can build records compliant with them.
First of all, it is worth mentioning that the following configuration is set by default therefore we don’t need it. However, it is worth mentioning it.
rabbit:
  schema:
    autoLoadSchemas: true (1)
    rootSchemaFolder: /avro (2)
registryURL: http://localhost:8990| 1 | Tell Reactive RabbitMQ Streams to automatically import all the schemas found at rootSchemaFolder |
| 2 | Java classpath location to search for schemas which have extension .avsc. They can be nested
under subfolders too. |
Once we have the schemas loaded in memory, we can ask Reactor RabbitMQ Streams to create records for those schemas so that we can set the fields.
GenericData.Record record = reactiveRabbit.schemaManager().newRecord("schemas.event.Event"); (1)
record.put("id", String.valueOf(n));
record.put("timestamp", System.currentTimeMillis());
return record;| 1 | We need to specify the schema’s full name which is made up of the namespace followed by a dot and the schema name. |
To consume Avro generic records using tolerant reader applications
If we are consuming Avro generic records, we have two choices depending on our application. If our application is very tolerant and can handle missing fields then there is nothing special we need to do in our application as demonstrated below.
@Bean
@ConditionalOnProperty(name = "role", havingValue = "consumer-generic-event", matchIfMissing = false)
public CommandLineRunner consumerGenericEvent(Consumer<TopologyBuilder> eventTopology) {
  return (args) -> {
    rabbit.declareTopology(eventTopology)
      .createTransactionalConsumerStream(queue, GenericData.Record.class) (1)
      .whenReceiveIllegalEvents()
        .alwaysReject()
      .then()
      .receive()
      .transform(ReactiveRabbit.commitElseTerminate())
      .subscribe(e -> log.info("Received {}", toString(e)));
  };
}| 1 | We are streaming Avro records however we do not have any preference on the exact version we want to use. Our application is very robust and can handle missing fields. |
To consume Avro generic records using not tolerant reader applications
In the contrary, if our application expects some fields to always have a value because we coded it thinking on certain schema which provided default values for optional fields then we want to configure our stream to use that schema instead. However, we could get more fields but not less.
@Bean
@ConditionalOnProperty(name = "role", havingValue = "consumer-generic-event-v6", matchIfMissing = false)
public CommandLineRunner consumerGenericEventV6(Consumer<TopologyBuilder> eventTopology) {
  return (args) -> {
    rabbit.declareTopology(eventTopology)
      .createTransactionalConsumerStream(queue, GenericData.Record.class) (1)
      .withAvroCodec()
          .genericSchemaReaderFullName("schemas.event.v6.Event")  (2)
      .and()
      .whenReceiveIllegalEvents()
          .alwaysReject()
      .then()
      .receive()
      .transform(ReactiveRabbit.commitElseTerminate())
      .subscribe(e -> log.info("Received {}", toString(e)));
  };
}| 1 | We are streaming generic Avro records |
| 2 | However, we want to use a specific schema to read the events |
3.15.4. Testing various schema evolution scenarios
We said earlier that to demonstrate the impact of evolving an schema we are going to use 2 schemas, vN and vN+1, in other words, the previous schema and the newer schema.
We use Event_v1.asc as vN:
{
  "namespace" : "schemas.event",
  "type" : "record",
  "name" : "Event",
  "fields" : [
    {"name":"id","type":"string"},
    {"name":"timestamp","type":"long", "default": 0}
  ]
}
Before going ahead with the scenarios, let’s first run the schema registry server. It will run in the background.
bin/deploy-schema-registry
Scenario 1 - Adding mandatory field
Event_v2_AddingMandatoryField.avsc
{
  "namespace" : "schemas.event.v2",
  "type" : "record",
  "name" : "Event",
  "fields" : [
    {"name":"id","type":"string"},
    {"name":"timestamp","type":"long", "default": 0},
    {"name":"number","type":"long"} (1)
  ]
}| 1 | Add a mandatory field number |
Verifying forward compatibility
This change will NOT impact vN consumers as we will see now. Therefore vN+1 is forward compatible.
Run the following command to produce vN+1 events:
./run --role=producer-specific-event-v2
Run the following command to consume events with vN consumer:
./run --role=consumer-specific-event-v1
Verifying backward compatibility
However, it will impact vN+1 consumers because it won’t be able to consume vN, only vN+1. Therefore, vN+1 is NOT backward compatible.
Run the following command to produce vN events:
./run --role=producer-specific-event-v1
Run the following command to consume events with vN+1 consumer:
./run --role=consumer-specific-event-v2
Scenario 2 - Adding optional field
Event_v3_AddingOptionalField.avsc
{
  "namespace" : "schemas.event.v3",
  "type" : "record",
  "name" : "Event",
  "fields" : [
    {"name":"id","type":"string"},
    {"name":"timestamp","type":"long", "default": 0},
    {"name":"number","type":"long", "default": 0} (1)
  ]
}| 1 | Add a optional field number |
Scenario 3 - Deleting optional field
Event_v4_DeletingOptionalField.avsc
{
  "namespace" : "schemas.event.v4",
  "type" : "record",
  "name" : "Event",
  "fields" : [
    {"name":"id","type":"string"}
    (1)
  ]
}| 1 | Deleted optional field timestamp |
Scenario 4 - Deleting optional field and adding a mandatory one
Event_v5_DeletingOptionalFieldAndAddingMandatory.avsc
{
  "namespace" : "schemas.event.v5",
  "type" : "record",
  "name" : "Event",
  "fields" : [
    {"name":"id","type":"string"},
    (1)
    {"name":"number","type":"long"} (2)
  ]
}| 1 | Deleted optional field timestamp |
| 2 | Added new mandatory field number |
Verifying forward compatibility
Run the following command to produce vN+1 events:
./run --role=producer-specific-event-v5
Run the following command to consume events with vN consumer:
./run --role=consumer-specific-event-v1
Verifying backward incompatibility
Run the following command to produce vN events:
./run --role=producer-specific-event-v1
Run the following command to consume event with vN+1 consumer:
./run --role=consumer-specific-event-v5
Check out the depth of events-dlq queue. It should have all v1 events because
our consumer could not consume them. Instead it were rejected and moved them onto the
events-dlq queue.

Remember to purge the events-dlq before proceeding with the next scenarios.
|
Scenario 5 - Replacing optional field
Event_v6_DeletingOptionalFieldAndAddingOptional.avsc
{
  "namespace" : "schemas.event.v6",
  "type" : "record",
  "name" : "Event",
  "fields" : [
    {"name":"id","type":"string"},
    (1)
    {"name":"number","type":"long", "default": 0} (2)
  ]
}| 1 | Deleted optional field timestamp |
| 2 | Added new optional field number |
Scenario 6 - Replacing mandatory field
Event_v7_ReplacingMandatoryField.avsc
{
  "namespace" : "schemas.event.v7",
  "type" : "record",
  "name" : "Event",
  "fields" : [
    (1)
   {"name":"number","type":"long"} (2)
  ]
}| 1 | Deleted mandatory field id |
| 2 | Added new mandatory field number |
Scenario 7 - Deleting mandatory field and adding optional
Event_v8_AddingOptionalAndDeletingMandatory.avsc
{
  "namespace" : "schemas.event.v8",
  "type" : "record",
  "name" : "Event",
  "fields" : [
    (1)
    {"name":"timestamp","type":"long", "default": 0},
    {"name":"number","type":"long", "default": 0} (2)
  ]
}| 1 | Deleted mandatory field id |
| 2 | Added new optional field number |
3.16. Deploy to Pivotal Platform
In this tutorial, we are going to learn how to automatically configure our streaming applications when they are deployed to Pivotal Platform and use its RabbitMQ managed-service.
In fact, there is nothing we need to do in our application’s code or in the configuration.
3.16.1. Application name and instance id comes from the Platform
When we deploy an application to Pivotal Platform,
Reactor RabbitMQ Streams takes the application name from VCAP_APPLICATION environment variable
and application instance_id from CF_INSTANCE_INDEX.
Otherwise, it takes the name from spring.application.name and generates a random instance_id.
| Reactor RabbitMQ Streams uses application name and instance id to name connections and to support partitioned queues. |
3.16.2. Endpoints comes from RabbitMQ Service instance credentials
When we bind our application to one or many RabbitMQ Service instances, Reactor RabbitMQ Streams automatically adds them as endpoints.
For instance, lets say we have an application with the following application.yml:
spring.application.name: sample-app   (1)
rabbit:
  endpoints:
    local-dev:  (2)
      username: some-dummy-user
      password: and-password
      host: localdev
    default:  (3)
      connection:
        retryMax: 20
      topology:
retryMax: 20| 1 | Application name ignored when we deploy to Pivotal Platform |
| 2 | Endpoint used for local development outside of Pivotal Platform |
| 3 | Default settings for all endpoints |
And we deploy our application with 2 RabbitMQ services using the following manifest:
---
applications:
- name: cf-sample-app
  path: target/sample-app-0.0.1-SNAPSHOT.jar
  health-check-type: process
  services:
   - rabbit-1
   - rabbit-2
When the application starts, Reactor RabbitMQ Streams is initialized with the following setup:
-
Endpoint
local-dev -
Endpoint
rabbit-1 -
Endpoint
rabbit-2 -
The default endpoint is randomly picked between
rabbit-1andrabbit-2. In other words, locally configured endpoints are not considered. If we wanted to preempt one specific endpoint, we could use the following manifest instead:
applications:
- name: cf-sample-app
  path: target/sample-app-0.0.1-SNAPSHOT.jar
  health-check-type: process
  env:
    RABBIT_DEFAULT_ENDPOINT_NAME: rabbit-1  (1)
  services:
   - rabbit-1
- rabbit-2| 1 | Choose rabbit-1 as the default endpoint |
However, if an application needs 2 endpoints, most likely, each endpoint has a specific purpose therefore when we open an stream we should explicitly select that endpoint and not the default like shown below:
@Autowired
RabbitEndpointService rabbit;
...

reactiveRabbit
   .selectEndpoint("rabbit-1")
   .declareTopology(...)
   ...
In our set up above, rabbit-1 and rabbit-2 endpoints, are automatically configured
with the defaults provided in application.yml. That is, the connection retry settings or topology retry
settings.
|
Make sure you do not have any ssl configuration under default endpoint when deploying to
Pivotal Platform. Otherwise, you will be overriding the already configured truststore by Pivotal Platform.
See the next section for more details.
|
3.16.3. TLS Support
There is nothing we need to do in our streaming application to enable TLS.
When we configure a RabbitMQ Service instance with TLS, all the addresses are AMQPs and HTTPs. Moreover, Pivotal Platform automatically configures the JVM with a trust store with the appropriate certificates installed so that we can establish a secure connection. This is thanks to the Java buildpack.
Mutual TLS is not yet supported in RabbitMQ for Pivotal Platform v.18. However, whenever it is supported, it will be also transparent to our application. Pivotal Platform also configures the JVM with the key store with application’s pkcs12.
3.16.4. Function-based streaming application
This is the first time we touch upon this concept of Function-based streaming applications. It is a programming model suitable for simple streaming applications whose business logic can be encapsulated into a single function. This is nowadays called Function as a Service.
There are 3 types of functions:
-
a supplier is a function that produces an output and takes no input. A supplier FaaS is an application that sends events to RabbitMQ. It requires a supplier function which provides the Flux of events to send to RabbitMQ.
-
a processor is a function that takes an input and produces an output. A processor FaaS is an application that receives events from an stream (bound to a queue), calls a processor function to convert the input event onto an output event. And eventually, the output event is sent RabbitMQ via another stream.
-
and a consumer is a function that takes an input and produces no output. A consumer FaaS is an application that receives events and calls a consumer function to process them.
| So far, Reactor RabbitMQ Streams does not support yet the ability to define streams via configuration. We still have to create them by code. However, in the future, we would be able to define the stream by configuration along with the name of the corresponding function so that we do not have to code anything except the implementation of our functions. |
In the next section, we will introduce an application of each type, but for now, we wanted to provide a sample code of a supplier application to grasp the idea.
@Bean("numbers")
public Supplier<Flux<Integer>> eventSupplier() {  (1)
  return () -> {
    return Flux.range(1, Integer.MAX_VALUE).delayElements(this.delay).doOnNext((e) -> {
       log.info("Supplying {}", e);
    });
  };
}

@Bean
public Disposable stream(Consumer<TopologyBuilder> topology,
    @Value("${output:numbers}") String exchange,
    @Qualifier("numbers") Supplier<Flux<Integer>> supplier) { (2)

  return this.rabbit
    .declareTopology(topology)
    .createProducerStream(Integer.class)
    .route()
      .toExchange(exchange)
    .then()
    .send(supplier.get())
    .subscribe();
}| 1 | Implement our Supplier function. |
| 2 | Inject our Supplier function. If our application is a pure FaaS, there should
only be one single Supplier function therefore we do not need to use Qualifier.
However, if our application may have multiple @Bean of the same type then we have to
be more precise as to which supplier function we want to use. |
3.16.5. Demonstration
Under getting-started/deploy-pivotal-platform folder we have the following 3 applications:
Before deploying the application make sure you have a RabbitMQ Service instance called rabbit. For instance, here
is a sample command to do it:
cf create-service p.rabbitmq single-node rabbit|
If you want to enable TLS, create the service like this: |
Then run the following command to build and deploy all the applications:
cd deploy-pivotal-platform
./deploy| It fails if the service does not exist |
To check what numbers the supplier is producing:
cf logs cf-supplierTo check what numbers the consumer is consuming:
cf logs cf-consumer4. Appendix - Release History
v0.0.9
-
Replace
reactive-rabbitmq-1.5.2-SNAPSHOT.jarwith officialreactive-rabbitmq-1.5.2.jar. -
Add ability to declare quorum queues
-
Add ability to configure queue
max-length-bytes. Previous version only supportedmax-length
v0.0.8
-
Upgrade to
reactive-rabbitmq-1.5.2-SNAPSHOT.jar. This patch fixes two issues. The first one prevents loosing a message when after we exhaust all attempts to resend it. This can easily happen when the client cannot quickly reconnect with the broker. The second issue prevents producers hang waiting for a negative or positive confirmation that never arrives when the connection drops with pending unconfirmed messages. -
Upgrade
reactor-coreto3.4.2 -
Upgrade rabbitmq
http-clientto3.9.0.RELEASE -
Upgrade
reactor-extrato3.4.2 -
Update
reactor-nettyto1.0.4 -
Upgrade
reactor-rabbitmq-streams-autoconfigureto spring boot2.4.3 -
Upgrade all getting started guides to use spring boot
2.4.3
v0.0.7
-
Configure RabbitMQ ConnectionFactory’s setting
channelShouldCheckRpcResponseType.
The default value is false. To set it to true we need to configure the endpoint as follows .advanced.channelShouldCheckRpcResponseType: true.
The reason to expose this setting is to prevent issues whereby the Channel expects certain type of
message from the broker such as declare-queue-ok however the Channel receives a different type.
When channelShouldCheckRpcResponseType is false, the Channel does not check the type and it causes
a ClassCastException. When it is true, the Channel checks the type and if the message does not match
the expected type, it drops it.
This issue has been raised but we have not been able to reproduce it. Ideally, we should get to the bottom of the problem as to why the Channel gets a totally unexpected response message. In the meantime, setting this setting to true may prevent the ClassCastException.
v0.0.6
-
Fix issue Autoconfigure rootSchemaFolder Bug (Windows). Thanks to @lepsalex for his contribution.
v0.0.5
-
Upgrade to Spring Boot 2.2.6 and along with it also Project Reactor
-
Add OnDemandSource which allows applications to programatically send events to a TransactionalProducerStream.
-
Add getting-started guide
routing/from-rest-to-streamthat shows how to route events from a Reactive REST endpoint to a Reactor RabbitMQ Stream. -
Developers can now supply a single router function through which they can control entirely define exchange, routing key, message attributes and headers.
-
Serialization exceptions thrown by
Codecor exceptions thrown while building the event’s message are handled with a strategy (whenUnserializable().reject()orwhenUnserializable().terminate())
v0.0.4
-
Auto-configure library from VCAP_SERVICES/VCAP_APPLICATION when runtime is Pivotal Platform
-
Add getting-started guide,
deploy-pivotal-platformwith 3 sample applications that can be deployed to Pivotal Platform. -
Fix issue #14 - Failed to start when addresses have virtual host in the uri
v0.0.3
-
Add support for (m)TLS
v0.0.2
-
Introduced the concept of Topology.
-
Deprecate TopicStream and introduce these streaming classes:
-
ProducerStream
-
TransactionalProducerStream
-
ConsumerStream
-
TransactionalConsumerStream
-